Difference between revisions of "Help:MediaWiki basics/Advanced training"
Shawndouglas (talk | contribs) (Added categories. Need to add more material.) |
Shawndouglas (talk | contribs) (Updated content.) |
||
| Line 170: | Line 170: | ||
|- | |- | ||
|} | |} | ||
====Finding and adding categories==== | |||
You can find existing categories by browsing the special [[Special:Categories|categories]] page of the wiki. To view most of them at once, select the option at top to view 500 of them. | |||
You'll likely notice many of the categories are for managing the infrastructure of the wiki. If you are adding numerous pages to the wiki, can't find a suitable category, and need a category to group your pages under, you can always make a new category. A category is also a page that happens to be in the Category [[Help:Namespaces|namespace]], thus you're essentially just creating a page when you make a category. For more on editing a category page, see [[Help:Category#Category pages]]. | |||
To add a category to a page without categories, go to the bottom of the page and begin by adding this: <code><nowiki><!---Place all category tags here--></nowiki></code> | |||
Under that you'll begin adding categories. The format you use: <code><nowiki>[[Category:CategoryName]]</nowiki></code> | |||
For example, if you want to add a page to the "Informatics" and "Information science" categories, you'll add the following code to the bottom of the page: | |||
<pre> | |||
<!---Place all category tags here--> | |||
[[Category:Informatics]] | |||
[[Category:Information science]] | |||
</pre> | |||
One final note: If you want to create an internal link to an existing category within the wiki text, you need to add a colon in front of the word "Category" like so: <code><nowiki>[[:Category:CategoryName]]</nowiki></code> | |||
Thusly, if you want an internal link to the "Informatics" category, <code><nowiki>[[:Category:Informatics]]</nowiki></code> yields [[:Category:Informatics]] and <code><nowiki>[[:Category:Informatics|informatics]]</nowiki></code> yields [[:Category:Informatics|informatics]]. | |||
==Advanced exercise== | ==Advanced exercise== | ||
| Line 188: | Line 210: | ||
4. Remember that quote you added to your text in the intermediate training? You were asked to note the exact source of the quote. Well, now is the time to apply the correct citation template to that quote and populate it with the details of the source. Place the citation at the end of the quote, complete with a unique "ref name". | 4. Remember that quote you added to your text in the intermediate training? You were asked to note the exact source of the quote. Well, now is the time to apply the correct citation template to that quote and populate it with the details of the source. Place the citation at the end of the quote, complete with a unique "ref name". | ||
5. Add your sandbox page to the category "User sandbox". Save your work | |||
6. Go to [[User talk:Shawndouglas]], select "edit", and under your original header you started from the beginner exercise leave a comment stating you've completed the advanced exercise. Be sure to sign your comment! | |||
<!---Place all category tags here--> | <!---Place all category tags here--> | ||
[[Category:LIMSwiki training]] | [[Category:LIMSwiki training]] | ||
Revision as of 23:09, 22 October 2013
|
|
This is advanced training material for MediaWiki. If you still have problems after reviewing and practicing the material found here and in the beginner and intermediate guides, you can request help on this discussion page. |
Advanced topics in MediaWiki
Note: When opening links from wiki pages, right-click a link and choose to open it in a new tab. This should make navigating your way through the wiki less complex.
Templates
In the previous training section, we briefly touched on the template. Here's the example we used in that section:
 |
Chords being played on an accordion
|
| Problems playing this file? See media help. | |
{{Listen
| filename    = Accordion chords-01.ogg
| title       = Accordion chords
| description = Chords being played on an accordion
| pos         = left
}}
As we stated, that code is used in relation to the Listen template. A template typically contains repetitive material that might need to show up on any number of articles or pages. The most common method of inclusion is called transclusion, where the wikitext of the target page contains a reference to the template using the {{Template name}} syntax. In this case it's {{Listen}}, and it includes some modifiable parameters.
Now let's get back to that box with text and a big blue "i" at the top. We call that an "infobox." That's created using the template "ombox". Templates are held in their own special namespace on the wiki. Open the previously mentioned ombox link in a new tab to learn more about this template. As you review it, you'll notice the parameters that can be associated with this template:
{{ombox
| type  = speedy / delete / content / style / notice / move / protection
| image = none / [[Image:Some image.svg|40px]]
| imageright = [[Image:Some image.svg|40px]]
| style = CSS values
| textstyle = CSS values
| text  = The message body text.
| small = {{{small|}}} / yes
| smallimage = none / [[Image:Some image.svg|30px]]
| smallimageright = none / [[Image:Some image.svg|30px]]
| smalltext  = A shorter message body text.
}}
A proper template page will also include documentation on how to use it, so don't feel too overwhelmed. For now, know template formatting is distinct because placing a template in another page involves placing two opening braces in front (like this: {{ ), the name of the template, the desired parameters associated with it, and finally two closing braces in the back (like this: }} ), just as we've seen in the above examples.
Here are some internal links to pages on this wiki that utilize a variety of different templates. Let's open each page in a new tab and choose the "edit" option to see the code. Then, let's identify all the templates used in those pages:
- LIMS vendor
- LIMSWiki:Vendor page
- 2nd Sight Solutions
- National Cancer Institute
- LIMSWiki:Product page
After looking in the code for curly braces, we find...
- Item one uses: Template:Ombox; Template:Cite web
- Item two uses: Template:Infobox company; Template:Ombox
- Item three uses: Template:Infobox company; Template:Ombox productfeature; Template:Databox LIMSfeature; Template:Cite web
- Item four uses: Template:Infobox government agency; Template:Cite news; Template:Cite web; Template:Ombox productfeature; Template:Databox LIMSfeature
- Item five uses: Template:Infobox laboratory equipment; Template:Ombox; Template:Infobox software; Template:Start date; Template:Start date and age
Notice the wide variety of templates already in use. Looking at a complete list of templates perhaps makes the topic even more daunting. Don't be afraid; templates have very practical uses and make information presentation more standardized and rapid. As for determining what the most-used templates are on this wiki... that's a more difficult task. However, the sampling above should give you an idea that ombox, citation, infobox, and databox templates are used often in the wiki.
For more on templates, consult the relevant help section or the MediaWiki handbook for more information.
One final note: honestly, the type of template you're most likely to use on the wiki shouldn't surprise you. Of course, it's the citation template.
Citations
Just as on Wikipedia, the strength of LIMSwiki's content depends heavily on the citation system. Users deserve factual information — not marketing or advertising speak — that is backed up with quality online and offline sources. But when should you cite sources? When in doubt, add a citation. By citing claims in LIMSwiki content, you enable users to verify the stated information is supported by reliable sources, thus improving the credibility of LIMSwiki and the vendor, product, and encyclopedic information contained within. You also effectively aid users needing additional information on the subject, and you additionally avoid plagiarizing the source of your words or ideas by giving attribution.
How do you use citations on this wiki? The preferred method of citation is using inline citations via citation templates. The most common ones you're likely to use include:
What makes a citation?
Let's look at a particularly citation-dense section of text from the wiki. This content is taken from the beginning of the electronic laboratory notebook history section:
While some credit Dr. Keith Caserta with the concept of an electronic version of the laboratory notebook<ref name="EarlyELN">{{cite journal |editor=Matthews, Marge |url=http://digital.library.unt.edu/ark:/67531/metadc5647/m1/48/ |title=Meeting Program Division of Chemical Education |journal=Chemical Information Bulletin, A Publication of the Division of Chemical Information of the ACS |publisher=University of North Texas Digital Library |pages=64 |year=1993 |volume=45 |issue=3 |accessdate=03 May 2011}}</ref>, it's likely that others had similar early ideas on how to integrate computing into the process of laboratory note taking.<ref name="ELNLifeArch">{{cite web |url=http://web.me.com/evildrbob/Site/My_ELN_Life/My_ELN_Life.html |archiveurl=http://web.archive.org/web/20110515133816/http://web.me.com/evildrbob/Site/My_ELN_Life/My_ELN_Life.html |title=My ELN Life |author=Rumpf, Wolfgang |publisher=Wolfgang Rumpf, Ph.D |archivedate=15 May 2011 |accessdate=05 March 2013}}</ref> Significant discussion concerning the transition from a pen-and-paper laboratory notebook to an electronic format was already in full swing in the early 1990s. During the 206th National Meeting of the American Chemical Society in August, 1993, an entire day of the conference was dedicated to talking about "electronic notebooks" and ELNs.<ref name="MMattChemEd">{{cite journal |url=http://digital.library.unt.edu/ark:/67531/metadc5647/m1/48/ |title=Meeting Program Division of Chemical Education |journal=Chemical Information Bulletin, A Publication of the Division of Chemical Information of the ACS |editor=Matthews, Marge |publisher=University of North Texas Digital Library |pages=46 |year=1993 |volume=45 |issue=3 |accessdate=03 May 2011}}</ref> "A tetherless electronic equivalent of the paper notebook would be welcomed by the working scientist," noted Virginia Polytechnic Institute's Dr. Raymond E. Dessy for the conference.<ref name="EarlyELN" /> Dessy had in the mid-1980s begun postulating on the idea of an electronic notebook, and by 1994 he provided one of the first working examples of an ELN.<ref name="BormanELNRev">{{cite journal |url=http://pubs.acs.org/doi/abs/10.1021/cen-v072n021.p010 |format=PDF |journal=Chemical Engineering News |year=1994 |volume=72 |issue=21 |pages=10–20 |title=Electronic Laboratory Notebooks May Revolutionize Research Record Keeping |author=Borman, Stu |doi=10.1021/cen-v072n021.p010 |accessdate=03 May 2011}}</ref>
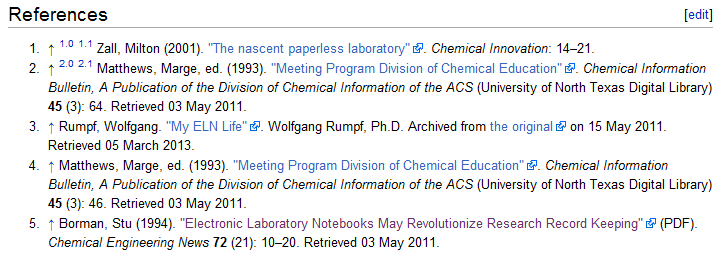
In that paragraph alone there are four separate citations, one of them used twice. Two different types of citation template are used: Citation web and Citation journal. We also notice each template is wrapped in a set of two tags: <ref name=""> in front and </ref> at the end. These tags tell the system "heh, I'm a reference and should be noted as such with an inline reference number and included in the References section at the end of the page." It then places the contents of the enclosed citation template into the References section with the appropriate reference number. Let's look at this closer:
To the left is an image of the text produced from the above code, and to the right is an image of the resulting citations in the References section. Note the numerical blue links placed inline into the text and how those numbers correspond to the numerical reference in the References section. If you were to click on the blue two in the text, it would take you to citation two in References. Notice how the first and penultimate sentences have the same number, meaning they share the same citation.
Looking at all this, what are the important points to be made?
<ref name="">and</ref>are going to always surround an inline citation. For each unique citation, a unique "ref name" will need to be assigned. Why? Because...- When you need to use a previously made citation later in the text, you don't have to enter the whole citation template again. Instead, you can simply repeat the "ref name" tag, add a / and be done. You can see this in the above code after the penultimate sentence:
<ref name="EarlyELN" />. Simply reuse the named reference and be done! Convenient, yes? - It's imperative to include a references section on any page that includes inline citations. Otherwise, pages won't show up properly. You do that by placing the following code at the bottom of the page:
==References==
<references />
Miscellaneous details
A few more points should be made about citations and how to populate the paramaters. In no particular order:
- When adding a date to the "date", "accessdate", and "archivedate" parameters, always use a "DD Month YYYY" format. Looking in the ELN code posted previously, you'll see examples of this: 03 May 2011, 05 March 2013, etc.
- URLs must contain "http://" or "https://" etc. in them or the citation will not render correctly in References.
- Due to idiosyncrasies in the citation templates, omit the end period from entities populated in parameters like "publisher" or a double period will appear in the citation. (e.g. "Widgets, Inc" instead of "Widgets, Inc.")
- If you forget a
</ref>tag, you will see the following error in the References section: "Cite error:<ref>tags exist, but no<references/>tag was found". If you see such a message and the<references/>tag is definitely at the bottom of your page, check all your "ref" tags. - The Internet Archive is a valuable tool for finding online content that no longer appears on the web. Of course, not everything is archived, but you often can find archived web pages for citation use. Notice reference three in the above ELN example uses this tool. When citing content from the Internet Archive, always add the "archiveurl" and "archivedate" parameters to your Cite web template. If you forget the "archivedate" parameter, the system will show an error message in the citations stating "Error: If you specify
|archiveurl=, you must also specify|archivedate=".
Unpopulated citation examples
In theory you can simply have a few examples of unpopulated citation templates at the ready. Copy and paste the code, completing the necessary fields and deleting the unnecessary. Here are a few unpopulated citation templates for your future use:
<ref name="">{{cite web |url= |format= |title= |work= |author= |publisher= |date= |accessdate=}}</ref>
<ref name="">{{cite book |url= |chapter= |title= |author= |pages= |publisher= |year= |edition= |volume= |isbn= |accessdate=}}</ref>
<ref name="">{{cite journal |url= |format= |journal= |chapter= |title= |author= |year= |volume= |issue= |pages= |pmid= |doi= |accessdate=}}</ref>
<ref name="">{{cite news |url= |format= |title= |author= |agency= |publisher= |newspaper= |pages= |location= |date= |accessdate=}}</ref>
For additional parameters, consult the documentation for each citation template.
Categories
Categories are used in LIMSwiki to link articles under a common topic. Categories help readers to navigate, sort, find articles, find related articles, and see how information is organized.
Each page can have one or more categories. If a page is placed in a category or more, you can find which ones by looking at the footer of the article for blue category links. For example, this page has only one category: Category: LIMSwiki training. Clicking the category name displays a list of articles in that category, as well any sub-categories.
Categories are to be selected appropriately based on the topic of the article, its title, or subject concerned. An article may have as few as one or two categories or as many as 20+. Here are a few examples:
| Name of LIMSwiki article | List of categories for the article |
|---|---|
| Informatics (academic field) | Informatics and Information science |
| Aurora Systems, Inc. | Vendors, LIMS vendor, Life sciences LIMS, and Veterinary LIMS |
And you can even put categories into other categories:
| Name of LIMSwiki category | List of categories for that category |
|---|---|
| Category:LIMSwiki maintenance | LIMSwiki administration |
| Category:Public health software (open source) | Health informatics and Open-source software |
Finding and adding categories
You can find existing categories by browsing the special categories page of the wiki. To view most of them at once, select the option at top to view 500 of them.
You'll likely notice many of the categories are for managing the infrastructure of the wiki. If you are adding numerous pages to the wiki, can't find a suitable category, and need a category to group your pages under, you can always make a new category. A category is also a page that happens to be in the Category namespace, thus you're essentially just creating a page when you make a category. For more on editing a category page, see Help:Category#Category pages.
To add a category to a page without categories, go to the bottom of the page and begin by adding this: <!---Place all category tags here-->
Under that you'll begin adding categories. The format you use: [[Category:CategoryName]]
For example, if you want to add a page to the "Informatics" and "Information science" categories, you'll add the following code to the bottom of the page:
<!---Place all category tags here-->
[[Category:Informatics]]
[[Category:Information science]]
One final note: If you want to create an internal link to an existing category within the wiki text, you need to add a colon in front of the word "Category" like so: [[:Category:CategoryName]]
Thusly, if you want an internal link to the "Informatics" category, [[:Category:Informatics]] yields Category:Informatics and [[:Category:Informatics|informatics]] yields informatics.
Advanced exercise
Time to go back to the sandbox you created on your profile page, where you've hopefully already completed the beginner and intermediate exercise. If you haven't done those exercises, go back and do them now.
1. Open your sandbox for editing. Read over your previously written material concerning your favorite subject in grade school or university. Again, we're going to supplement this material with what we've learned in this training session.
2. After re-reading your content, think of how you can 1. use "Template:Ombox" effectively in your topic content and 2. apply citations to the text you've written. If your text is lacking in facts, add some information that would require a citation or two.
3. Integrate the following items into your existing content, modifying the text and its organization as needed:
- one {{ombox}} template, including the following parameters: type, image, style, and text
- a section called "External links" (using a header) at the bottom, and under that a bulleted list of at least two external web links relating to your content (refer to the beginner training if you don't remember how to do this)
- a "References" section at the bottom of the page (after "External links")
- at least three unique citations using proper citation templates
4. Remember that quote you added to your text in the intermediate training? You were asked to note the exact source of the quote. Well, now is the time to apply the correct citation template to that quote and populate it with the details of the source. Place the citation at the end of the quote, complete with a unique "ref name".
5. Add your sandbox page to the category "User sandbox". Save your work
6. Go to User talk:Shawndouglas, select "edit", and under your original header you started from the beginner exercise leave a comment stating you've completed the advanced exercise. Be sure to sign your comment!


