Help:MediaWiki basics/Beginner training
|
|
This is training material for beginners to MediaWiki. If you still have problems after reviewing and practicing the material found here and in the intermediate and advanced guides, you can request help on this discussion page. |
Getting started with MediaWiki
Note: When opening links from wiki pages, right-click a link and choose to open it in a new tab. This should make navigating your way through the wiki less complex.
You'll notice a box with text and a big blue "i" in it above. We'll get to that in a bit. But first let's talk about...
Creating a page
A wiki is made up of parent pages and subpages, and each page has a unique title. When choosing a title for a page on LIMSwiki, the editor must be aware of the naming conventions for article titles. That previous blue link takes you to a page explaining those rules, including using lower case, using singular nouns, and avoiding abbreviations among others. Right-click that link, open it in a new tab, and read more about these naming conventions.
Done? The next thing we need to know about titles and page creation is that choosing a correct namespace is vital. Namespaces are a mechanism for grouping/separating wiki pages, differentiating between the purpose of the pages at a high level. Pages in certain namespaces can have special properties or behave differently when they interact with other pages. Namespaces are indicated in page titles by prefixing the page name with "namespace:", so the prefix "Help:" in this page's title ("Help:MediaWiki basics/Beginner training") indicates that this page is in the Help namespace. A page whose name is not prefixed by a namespace lies in the mainspace.
If you're not sure what space your page belongs in, you might want to check out Help:Namespaces.
How to create a page
The easiest way to create a new page on this site is to type the full title of the page you wish to create into the search box on any page and select "Go". Assuming the page does not already exist, you'll be asked if you want to create it. For example, if you wish to create a page titled "Nuclear reactor", type it into the search box, select "Go", and you'll see "Create the page 'Nuclear reactor" on this wiki!"
Finally, to create a subpage, simply add a / and the subtitle, following the usual naming conventions. This page you are on ("Help:MediaWiki basics/Beginner training") is an example of a subpage of Help:MediaWiki basics. Subpages should be created sparingly if at all.
Examples of page titles:
- User:Shawndouglas (in the "User" namespace)
- Help:MediaWiki basics (in the "Help" namespace; note the lowercase "basics")
- LIMSWiki:Bans and blocks (in the LIMSWiki namespace; note the lowercase after "Bans")
- Laboratory information management system (in the mainspace; note the lowercase and singularity after "Laboratory")
- The NELAC Institute (in the mainspace; note the proper case and "The" as it's the full name of the entity)
Links
Links provide embedded navigation to other content within the wiki or to content outside the wiki. They are an important part of wiki editing and provide convenient avenues for further user research.
Here are four of the most common link formation methods in MediaWiki:
- This is how to form an internal link to a different page on the same wiki: Laboratory
- This is how to form an internal link to the same "Laboratory" page, but this time making different text appear for the link: I'm such a rebel
- This is how to form an external link to the "Laboratory" page from LIMSwiki to Wikipedia: [1]
- This is how to form the same external link but using different link text: Wikipedia's page on the laboratory
You should notice the differences between internal and external links and how to format them:
- You can make an internal link by using a set of double square brackets. The title can be left as the default:
[[Laboratory informatics]]yields... Laboratory informatics
- Or you can give it a new title by adding a pipe (|) and then typing the text you want to appear in place of the original:
[[Laboratory informatics|cool laboratory stuff]]yields... cool laboratory stuff
- You can make an external link by using a set of single square brackets. The title can be left blank:
[http://clinfowiki.org]yields... [2]
- However, it's better you give it a title by adding one space and typing the text you want to appear in place of the URL:
[http://clinfowiki.org ClinfoWiki.org]yields... ClinfoWiki.org
Consult the relevant Help:Formatting section for more information.
Text formatting
Bold text
Here I bold this text for effect: Do you think it looks ok?
I can even make a link appear in bold like this: LIMS vendor
How did I do that? I simply added three single quotes to each side like so: '''Here I bold this text for effect''' yields... Here I bold this text for effect and '''[[Vendor:LIMS vendor|LIMS vendor]]''' yields... LIMS vendor
Italic text
Here's italic text for you: What do you think?
Like bold text, I can italicize a link like this: LIMS vendor
How did I do that? I simply added two single quotes to each side like so: ''Here's italic text for you'' yields... Here's italic text for you and ''[[Vendor:LIMS vendor|LIMS vendor]]'' yields...LIMS vendor
Spacing
This is my first line of text.
This is my second line of text.
Here's what I entered into the edit box to get the above to appear:
This is my first line of text.

This is my second line of text.
Notice what happens if I don't put a space between the lines of text in the edit screen? The lines run together. You'd think putting a line of text under another with a hard return would be enough, but it's not. You must add an additional hard return, creating a space between the lines in the edit box. I actually want it to look like this:
This is my first line of text.
This is my second line of text.
So I have to edit it like this in the code:
This is my first line of text. This is my second line of text.
Several other relevant text formatting techniques exist, but we'll get to them in the intermediate training guide.
Organizing text
Headings and subheadings
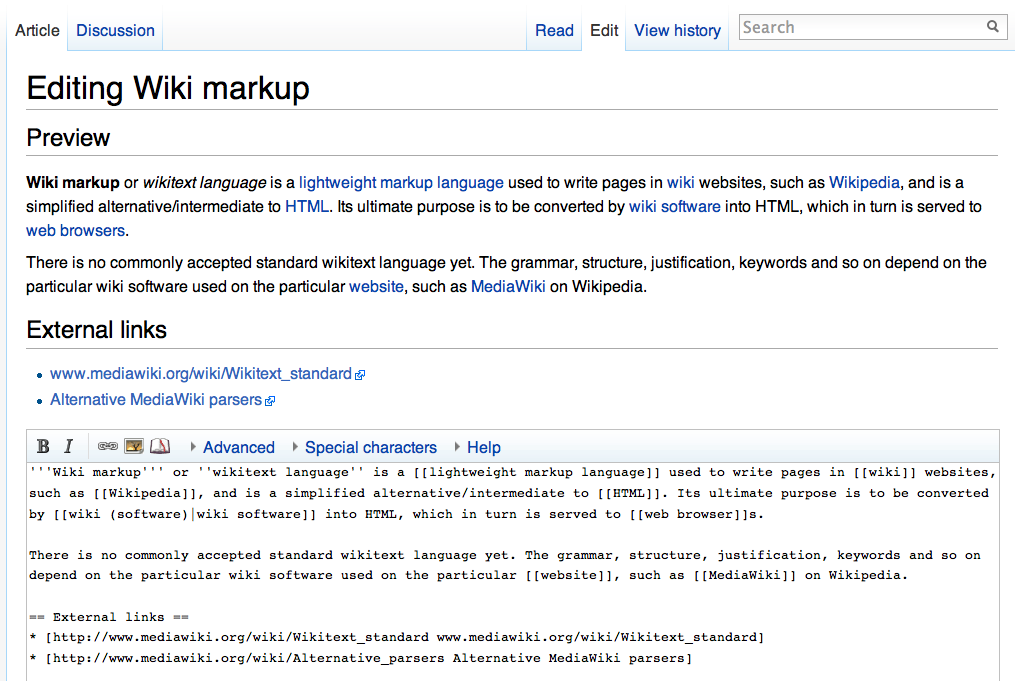
If you are viewing the code to this page (again, you do that by clicking the "edit" link at top), you'll notice there are several bits of code with numerous "=" signs. These are responsible for creating headings and subheadings.
You'll notice the first example:
==Getting started with MediaWiki==
This is the first level of headings, the section heading. You do this by placing two "=" in front and behind some text.
NOTE: Know we have a rule here, just as in Wikipedia; with the exception of proper nouns, only the first word of the heading or subheading is capitalized! In this case, it's "Getting started with MediaWiki", not "Getting Started With MediaWiki".
If you look under the heading "Getting started with MediaWiki", you'll notice numerous subheadings. And in the subsection "Text formatting" there is yet another subheading below that:
===Text formatting===

====Bold text====
Simply add another "=" to the front and back to create an additional subheading.
Lists
In several subsections of this page, you should have noticed two types of lists: bulleted and numbered lists. Both are simple to use and effective for organizing information in a wiki entry.
First let's look at the code for the first couple of bulleted items in the the Creating a page section:
* [[User:Shawndouglas]] (in the "User" namespace)
* [[Help:MediaWiki basics]] (in the "Help" namespace; note the lowercase "basics")
Adding an asterisk (*) in front of the lines of text produced a bulleted list. Feel free to place the bulleted items as shown above or add a hard return between each item (exhibited in the Links section of this page) to space out your bulleted items.
Now let's look at the code for the first couple of numbered items in the the Links section:
# This is how to form an internal link to a different page on the same wiki: [[Laboratory]]
# This is how to form an internal link to the same "Laboratory" page, but this time making different text appear for the link: [[Laboratory|I'm such a rebel]]
Adding the pound sign (#) in front of the lines of text produced an ordered numerical list. Notice no extra hard return was placed between the two items. This is an important distinction; look what happens if we separate the two lines with a hard return:
- This is how to form an internal link to a different page on the same wiki: Laboratory
- This is how to form an internal link to the same "Laboratory" page, but this time making different text appear for the link: I'm such a rebel
Lesson: If you want your numerical list to remain intact, don't add that extra hard return.
Finally, there's a third type of list we haven't used yet: the dictionary list. Here's an example:
- Laboratory informatics
- 1. the specialized application of information through a platform of instruments, software, and data management tools that allow scientific data to be captured, migrated, processed, interpreted, stored, managed, and shared
- Informatics
- 1. an increasingly broad academic field encompassing the concepts, structure, algorithms, theories, and human behavior associated with information accessing, processing, and sharing
- 2. the science of information, the practice of information processing, and the engineering of information systems
And the associated code:
;Laboratory informatics
: 1. the specialized application of information through a platform of instruments, software, and data management tools that allow scientific data to be captured, migrated, processed, interpreted, stored, managed, and shared
;Informatics
: 1. an increasingly broad academic field encompassing the concepts, structure, algorithms, theories, and human behavior associated with information accessing, processing, and sharing
: 2. the science of information, the practice of information processing, and the engineering of information systems
Essentially you begin with a semicolon for the term, and then a colon for each definition you want to apply. You add one item per line; a new line can appear before the colon, but using a space before the colon improves parsing.
Several other relevant text organization techniques exist, but we'll get to them in the intermediate training guide.
User pages and functions
User profile
Assuming you have an account here and are logged in, you should notice a few pieces of extra navigation in the top-right: 
Note, your version may have the word "my" in front of each word, but overall it should look like that. Notice in this example the username and talk links are red. (A red link in the wiki indicates the titled page hasn't been created yet.) This typically happens for new users who haven't set up their user profile and talk pages. Remember what we talked about in the beginning concerning creating a page? Well, that's exactly what should be done with these two pages. By selecting your username, you'll be invited to create and edit your user page in the User: namespace. Likewise, your talk page — another namespace called User talk: (or Help talk:, LIMSWiki talk:, or just Talk: depending on the namespace) where users can discuss problems, suggest changes, or give praise for an associated page — can be created so others can leave comments.
- Here's a user page: User:Shawndouglas
- Here's a user talk page: User talk:Shawndouglas
Note: A talk page is/can be associated with any non-talk page. To access the associated talk page of any non-talk page, select the "discussion" tab at the top-left of the page.
For now, if you haven't created these two pages, don't worry. You'll do that in the Beginner exercises section.
Commenting and signatures
We mentioned how you can leave comments, suggestions, and praise on User talk: and other talk pages. Like any other page, you do that by going to the talk page (select the "discussion" tab) and selecting the "edit" tab for that talk page. If this is your first comment on the talk page, you're encouraged to include a header which clearly states what your comment is about. Then type your comment, including any internal and/or external links as necessary. Finally, you should always sign your comment, letting the user know immediately who wrote the comment and when. You do this by ending with a series of four tildes, like this: ~~~~
One final note: when responding to an existing comment, it's courteous to use the colon (:) in front of your comment to indent it. Use multiple for further replies. Example:
==Great job on the Laboratory article==
Just wanted to give you kudos for the well-researched article! Keep at it. Joeuser 19:22, 10 February 2011 (EST)

: Thanks so much! I hope to add more content to the article as time allows. Let me know if I'm missing anything. Janeuser 12:12, 11 February 2011 (EST)

:: No, I don't see any glaring omissions. I'll watch the article though in case someone else gets crazy with the edits. ~~~~
Preferences
You can set numerous preferences for your account. Those preferences take effect when you are logged in. Feel free to change what you wish, but here are a few suggestions:
- Under the "User profile" tab ensure at a minimum "Email me when my user talk page is changed" is checked.
- Under the "Appearance" tab, be sure you have a preferred date format and time offset set.
- Under the "Editing" tab increase the size of your editing window to at least 60 columns and 40 rows, or for wide screens 80 columns and 40 or 50 rows. A bigger editing window is always handy.
- Also under the "Editing" tab, consider putting a check next to: Show preview before edit box; Show preview on first edit; Enable section editing by right clicking on section titles; Show edit toolbar; and Warn me when I leave an edit page with unsaved changes.
Watch a page
You can "watch" pages in MediaWiki. Pages you have a vested interest in and need to monitor can be watched. When changes are made to those pages, you'll be notified so you can review the changes as needed. To watch a page, simply select the "watch" link from the available tabs at the top-left. For example, you could watch your user page and talk page so you are notified of changes to them.
Note: Be sure to go to your preferences, and on the first tab "User profile" towards the bottom be sure to select "Email me when a page or a file on my watchlist is changed." Save your changes.
Beginner exercise
Well, it's time to practice everything you've learned here. Hopefully you haven't created your user page and user talk pages yet. If you have, you can still continue with this exercise, though skip the creation step listed at the beginning.
1. Create your user profile and user talk pages by clicking the red links as mentioned in User pages and functions. Add an introductory line of text to each page and save them.
2. Next, add a subpage to your user page (as described in How to create a page) called Sandbox. Do this by first adding an internal link to your user page, saving it, and then clicking the associated red link that appears. Add an introductory line of text to the Sandbox subpage and save it. (Hint: if you still need help, use User:Shawndouglas as a guide.)
3. It's time to play in your sandbox! Let's add two paragraphs about your favorite subject in grade school or university. You need to include the following elements in this text:
- at least one main header
- at least one subheader
- an example of bold text
- an example of italicized text
- your choice of either a bulleted or numbered list
- one definition list
- at least two internal links (the page Special:AllPages may come in handy)
- at least two external links, with link text
- proper spacing
4. Go to your User talk: page and choose to watch it.
5. Go to your user preferences and make all of the suggested changes listed in the Preferences section, including selecting the "Email me when a page or a file on my watchlist is changed" option.
6. Go to User talk:Shawndouglas, select "edit", add a new header, and leave a comment stating you've completed the beginner exercise. Be sure to sign your comment!
|
|
Ready to move on? Then head to the intermediate training or go back to the introductory training. |
