Metrology

Metrology is the scientific study of measurement.[1] It establishes a common understanding of units, crucial in linking human activities.[2] Modern metrology has its roots in the French Revolution's political motivation to standardise units in France when a length standard taken from a natural source was proposed. This led to the creation of the decimal-based metric system in 1795, establishing a set of standards for other types of measurements. Several other countries adopted the metric system between 1795 and 1875; to ensure conformity between the countries, the Bureau International des Poids et Mesures (BIPM) was established by the Metre Convention.[3][4] This has evolved into the International System of Units (SI) as a result of a resolution at the 11th General Conference on Weights and Measures (CGPM) in 1960.[5]
Metrology is divided into three basic overlapping activities:[6][7]
- The definition of units of measurement
- The realisation of these units of measurement in practice
- Traceability—linking measurements made in practice to the reference standards
These overlapping activities are used in varying degrees by the three basic sub-fields of metrology:[6]
- Scientific or fundamental metrology, concerned with the establishment of units of measurement
- Applied, technical or industrial metrology—the application of measurement to manufacturing and other processes in society
- Legal metrology, covering the regulation and statutory requirements for measuring instruments and methods of measurement
In each country, a national measurement system (NMS) exists as a network of laboratories, calibration facilities and accreditation bodies which implement and maintain its metrology infrastructure.[8][9] The NMS affects how measurements are made in a country and their recognition by the international community, which has a wide-ranging impact in its society (including economics, energy, environment, health, manufacturing, industry and consumer confidence).[10][11] The effects of metrology on trade and economy are some of the easiest-observed societal impacts. To facilitate fair trade, there must be an agreed-upon system of measurement.[11]
History
The ability to measure alone is insufficient; standardisation is crucial for measurements to be meaningful.[12] The first record of a permanent standard was in 2900 BC, when the royal Egyptian cubit was carved from black granite.[12] The cubit was decreed to be the length of the Pharaoh's forearm plus the width of his hand, and replica standards were given to builders.[3] The success of a standardised length for the building of the pyramids is indicated by the lengths of their bases differing by no more than 0.05 percent.[12]
In China weights and measures had a semi religious meaning as it was used in the various crafts by the Artificers and in ritual utensils and is mentioned in the book of rites along with the steelyard balance and other tools.[13]
Other civilizations produced generally accepted measurement standards, with Roman and Greek architecture based on distinct systems of measurement.[12] The collapse of the empires and the Dark Ages that followed lost much measurement knowledge and standardisation. Although local systems of measurement were common, comparability was difficult since many local systems were incompatible.[12] England established the Assize of Measures to create standards for length measurements in 1196, and the 1215 Magna Carta included a section for the measurement of wine and beer.[14]
Modern metrology has its roots in the French Revolution. With a political motivation to harmonise units throughout France, a length standard based on a natural source was proposed.[12] In March 1791, the metre was defined.[4] This led to the creation of the decimal-based metric system in 1795, establishing standards for other types of measurements. Several other countries adopted the metric system between 1795 and 1875; to ensure international conformity, the International Bureau of Weights and Measures (French: Bureau International des Poids et Mesures, or BIPM) was formed by the Metre Convention.[3][4] Although the BIPM's original mission was to create international standards for units of measurement and relate them to national standards to ensure conformity, its scope has broadened to include electrical and photometric units and ionizing radiation measurement standards.[4] The metric system was modernised in 1960 with the creation of the International System of Units (SI) as a result of a resolution at the 11th General Conference on Weights and Measures (French: Conference Generale des Poids et Mesures, or CGPM).[5]
Subfields
Metrology is defined by the International Bureau of Weights and Measures (BIPM) as "the science of measurement, embracing both experimental and theoretical determinations at any level of uncertainty in any field of science and technology".[15] It establishes a common understanding of units, crucial to human activity.[2] Metrology is a wide reaching field, but can be summarized through three basic activities: the definition of internationally accepted units of measurement, the realisation of these units of measurement in practice, and the application of chains of traceability (linking measurements to reference standards).[2][6] These concepts apply in different degrees to metrology's three main fields: scientific metrology; applied, technical or industrial metrology, and legal metrology.[6]
Scientific metrology
Scientific metrology is concerned with the establishment of units of measurement, the development of new measurement methods, the realisation of measurement standards, and the transfer of traceability from these standards to users in a society.[2][3] This type of metrology is considered the top level of metrology which strives for the highest degree of accuracy.[2] BIPM maintains a database of the metrological calibration and measurement capabilities of institutes around the world. These institutes, whose activities are peer-reviewed, provide the fundamental reference points for metrological traceability. In the area of measurement, BIPM has identified nine metrology areas, which are acoustics, electricity and magnetism, length, mass and related quantities, photometry and radiometry, ionizing radiation, time and frequency, thermometry, and chemistry.[16]
As of May 2019 no physical objects define the base units.[17] The motivation in the change of the base units is to make the entire system derivable from physical constants, which required the removal of the prototype kilogram as it is the last artefact the unit definitions depend on.[18] Scientific metrology plays an important role in this redefinition of the units as precise measurements of the physical constants is required to have accurate definitions of the base units. To redefine the value of a kilogram without an artefact the value of the Planck constant must be known to twenty parts per billion.[19] Scientific metrology, through the development of the Kibble balance and the Avogadro project, has produced a value of Planck constant with low enough uncertainty to allow for a redefinition of the kilogram.[18]
Applied, technical or industrial metrology
Applied, technical or industrial metrology is concerned with the application of measurement to manufacturing and other processes and their use in society, ensuring the suitability of measurement instruments, their calibration and quality control.[2] Producing good measurements is important in industry as it has an impact on the value and quality of the end product, and a 10–15% impact on production costs.[6] Although the emphasis in this area of metrology is on the measurements themselves, traceability of the measuring-device calibration is necessary to ensure confidence in the measurement. Recognition of the metrological competence in industry can be achieved through mutual recognition agreements, accreditation, or peer review.[6] Industrial metrology is important to a country's economic and industrial development, and the condition of a country's industrial-metrology program can indicate its economic status.[20]
Legal metrology
Legal metrology "concerns activities which result from statutory requirements and concern measurement, units of measurement, measuring instruments and methods of measurement and which are performed by competent bodies".[21] Such statutory requirements may arise from the need for protection of health, public safety, the environment, enabling taxation, protection of consumers and fair trade. The International Organization for Legal Metrology (OIML) was established to assist in harmonising regulations across national boundaries to ensure that legal requirements do not inhibit trade.[22] This harmonisation ensures that certification of measuring devices in one country is compatible with another country's certification process, allowing the trade of the measuring devices and the products that rely on them. WELMEC was established in 1990 to promote cooperation in the field of legal metrology in the European Union and among European Free Trade Association (EFTA) member states.[23] In the United States legal metrology is under the authority of the Office of Weights and Measures of National Institute of Standards and Technology (NIST), enforced by the individual states.[22]
Concepts
Definition of units
The International System of Units (SI) defines seven base units: length, mass, time, electric current, thermodynamic temperature, amount of substance, and luminous intensity.[24] By convention, each of these units are considered to be mutually independent and can be constructed directly from their defining constants.[25]: 129 All other SI units are constructed as products of powers of the seven base units.[25]: 129
| Base quantity | Name | Symbol | Definition |
|---|---|---|---|
| Time | second | s | The duration of 9192631770 periods of the radiation corresponding to the transition between the two hyperfine levels of the ground state of the caesium-133 atom[25]: 130 |
| Length | metre | m | The length of the path travelled by light in a vacuum during a time interval of 1/299792458 of a second[25]: 131 |
| Mass | kilogram | kg | Defined (as of 2019) by "... taking the fixed numerical value of the Planck constant, h, to be 6.62607015×10⁻³⁴ when expressed in the unit J s, which is equal to kg m2 s−1 ..."[25]: 131 |
| Electric current | ampere | A | Defined (as of 2019) by "... taking the fixed numerical value of the elementary charge, e, to be 1.602176634×10⁻¹⁹ when expressed in the unit C, which is equal to A s ..."[25]: 132 |
| Thermodynamic temperature | kelvin | K | Defined (as of 2019) by "... taking the fixed numerical value of the Boltzmann constant, k, to be 1.380649×10⁻²³ when expressed in the unit J K−1, which is equal to kg m2 s−2 K−1 ..."[25]: 133 |
| Amount of substance | mole | mol | Contains (as of 2019) "... exactly 6.02214076×10²³ elementary entities. This number is the fixed numerical value of the Avogadro constant, NA, when expressed in the unit mol−1 ..."[25]: 134 |
| Luminous intensity | candela | cd | The luminous intensity, in a given direction, of a source emitting monochromatic radiation of a frequency of 540×1012 Hz with a radiant intensity in that direction of 1/683 watt per steradian[25]: 135 |
Since the base units are the reference points for all measurements taken in SI units, if the reference value changed all prior measurements would be incorrect. Before 2019, if a piece of the international prototype of the kilogram had been snapped off, it would have still been defined as a kilogram; all previous measured values of a kilogram would be heavier.[3] The importance of reproducible SI units has led the BIPM to complete the task of defining all SI base units in terms of physical constants.[26]
By defining SI base units with respect to physical constants, and not artefacts or specific substances, they are realisable with a higher level of precision and reproducibility.[26] As of the revision of the SI on 20 May 2019 the kilogram, ampere, kelvin, and mole are defined by setting exact numerical values for the Planck constant (h), the elementary electric charge (e), the Boltzmann constant (k), and the Avogadro constant (NA), respectively. The second, metre, and candela have previously been defined by physical constants (the caesium standard (ΔνCs), the speed of light (c), and the luminous efficacy of 540×1012 Hz visible light radiation (Kcd)), subject to correction to their present definitions. The new definitions aim to improve the SI without changing the size of any units, thus ensuring continuity with existing measurements.[27][25]: 123, 128
Realisation of units
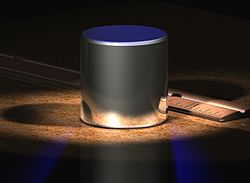
The realisation of a unit of measure is its conversion into reality.[28] Three possible methods of realisation are defined by the international vocabulary of metrology (VIM): a physical realisation of the unit from its definition, a highly-reproducible measurement as a reproduction of the definition (such as the quantum Hall effect for the ohm), and the use of a material object as the measurement standard.[29]
Standards
A standard (or etalon) is an object, system, or experiment with a defined relationship to a unit of measurement of a physical quantity.[30] Standards are the fundamental reference for a system of weights and measures by realising, preserving, or reproducing a unit against which measuring devices can be compared.[2] There are three levels of standards in the hierarchy of metrology: primary, secondary, and working standards.[20] Primary standards (the highest quality) do not reference any other standards. Secondary standards are calibrated with reference to a primary standard. Working standards, used to calibrate (or check) measuring instruments or other material measures, are calibrated with respect to secondary standards. The hierarchy preserves the quality of the higher standards.[20] An example of a standard would be gauge blocks for length. A gauge block is a block of metal or ceramic with two opposing faces ground precisely flat and parallel, a precise distance apart.[31] The length of the path of light in vacuum during a time interval of 1/299,792,458 of a second is embodied in an artefact standard such as a gauge block; this gauge block is then a primary standard which can be used to calibrate secondary standards through mechanical comparators.[32]
Traceability and calibration

Metrological traceability is defined as the "property of a measurement result whereby the result can be related to a reference through a documented unbroken chain of calibrations, each contributing to the measurement uncertainty".[33] It permits the comparison of measurements, whether the result is compared to the previous result in the same laboratory, a measurement result a year ago, or to the result of a measurement performed anywhere else in the world.[34] The chain of traceability allows any measurement to be referenced to higher levels of measurements back to the original definition of the unit.[2]
Traceability is obtained directly through calibration, establishing the relationship between an indication on a standard traceable measuring instrument and the value of the comparator (or comparative measuring instrument). The process will determine the measurement value and uncertainty of the device that is being calibrated (the comparator) and create a traceability link to the measurement standard.[33] The four primary reasons for calibrations are to provide traceability, to ensure that the instrument (or standard) is consistent with other measurements, to determine accuracy, and to establish reliability.[2] Traceability works as a pyramid, at the top level there is the international standards, which beholds the world's standards. The next level is the national Metrology institutes that have primary standards that are traceable to the international standards. The national Metrology institutes standards are used to establish a traceable link to local laboratory standards, these laboratory standards are then used to establish a traceable link to industry and testing laboratories. Through these subsequent calibrations between national metrology institutes, calibration laboratories, and industry and testing laboratories the realisation of the unit definition is propagated down through the pyramid.[34] The traceability chain works upwards from the bottom of the pyramid, where measurements done by industry and testing laboratories can be directly related to the unit definition at the top through the traceability chain created by calibration.[3]
Uncertainty
Measurement uncertainty is a value associated with a measurement which expresses the spread of possible values associated with the measurand—a quantitative expression of the doubt existing in the measurement.[35] There are two components to the uncertainty of a measurement: the width of the uncertainty interval and the confidence level.[36] The uncertainty interval is a range of values that the measurement value expected to fall within, while the confidence level is how likely the true value is to fall within the uncertainty interval. Uncertainty is generally expressed as follows:[2]
- Coverage factor: k = 2
Where y is the measurement value and U is the uncertainty value and k is the coverage factor[a] indicates the confidence interval. The upper and lower limit of the uncertainty interval can be determined by adding and subtracting the uncertainty value from the measurement value. The coverage factor of k = 2 generally indicates a 95% confidence that the measured value will fall inside the uncertainty interval.[2] Other values of k can be used to indicate a greater or lower confidence on the interval, for example k = 1 and k = 3 generally indicate 66% and 99.7% confidence respectively.[36] The uncertainty value is determined through a combination of statistical analysis of the calibration and uncertainty contribution from other errors in measurement process, which can be evaluated from sources such as the instrument history, manufacturer's specifications, or published information.[36]
International infrastructure
Several international organizations maintain and standardise metrology.
Metre Convention
The Metre Convention created three main international organizations to facilitate standardisation of weights and measures. The first, the General Conference on Weights and Measures (CGPM), provided a forum for representatives of member states. The second, the International Committee for Weights and Measures (CIPM), was an advisory committee of metrologists of high standing. The third, the International Bureau of Weights and Measures (BIPM), provided secretarial and laboratory facilities for the CGPM and CIPM.[37]
General Conference on Weights and Measures
The General Conference on Weights and Measures (French: Conférence générale des poids et mesures, or CGPM) is the convention's principal decision-making body, consisting of delegates from member states and non-voting observers from associate states.[38] The conference usually meets every four to six years to receive and discuss a CIPM report and endorse new developments in the SI as advised by the CIPM. The last meeting was held on 13–16 November 2018. On the last day of this conference there was vote on the redefinition of four base units, which the International Committee for Weights and Measures (CIPM) had proposed earlier that year.[39] The new definitions came into force on 20 May 2019.[40][41]
International Committee for Weights and Measures
The International Committee for Weights and Measures (French: Comité international des poids et mesures, or CIPM) is made up of eighteen (originally fourteen)[42] individuals from a member state of high scientific standing, nominated by the CGPM to advise the CGPM on administrative and technical matters. It is responsible for ten consultative committees (CCs), each of which investigates a different aspect of metrology; one CC discusses the measurement of temperature, another the measurement of mass, and so forth. The CIPM meets annually in Sèvres to discuss reports from the CCs, to submit an annual report to the governments of member states concerning the administration and finances of the BIPM and to advise the CGPM on technical matters as needed. Each member of the CIPM is from a different member state, with France (in recognition of its role in establishing the convention) always having one seat.[43][44]
International Bureau of Weights and Measures
The International Bureau of Weights and Measures (French: Bureau international des poids et mesures, or BIPM) is an organisation based in Sèvres, France which has custody of the international prototype of the kilogram, provides metrology services for the CGPM and CIPM, houses the secretariat for the organisations and hosts their meetings.[45][46] Over the years, prototypes of the metre and of the kilogram have been returned to BIPM headquarters for recalibration.[46] The BIPM director is an ex officio member of the CIPM and a member of all consultative committees.[47]
International Organization of Legal Metrology
The International Organization of Legal Metrology (French: Organisation Internationale de Métrologie Légale, or OIML), is an intergovernmental organization created in 1955 to promote the global harmonisation of the legal metrology procedures facilitating international trade.[48] This harmonisation of technical requirements, test procedures and test-report formats ensure confidence in measurements for trade and reduces the costs of discrepancies and measurement duplication.[49] The OIML publishes a number of international reports in four categories:[49]
- Recommendations: Model regulations to establish metrological characteristics and conformity of measuring instruments
- Informative documents: To harmonise legal metrology
- Guidelines for the application of legal metrology
- Basic publications: Definitions of the operating rules of the OIML structure and system
Although the OIML has no legal authority to impose its recommendations and guidelines on its member countries, it provides a standardised legal framework for those countries to assist the development of appropriate, harmonised legislation for certification and calibration.[49] OIML provides a mutual acceptance arrangement (MAA) for measuring instruments that are subject to legal metrological control, which upon approval allows the evaluation and test reports of the instrument to be accepted in all participating countries.[50] Issuing participants in the agreement issue MAA Type Evaluation Reports of MAA Certificates upon demonstration of compliance with ISO/IEC 17065 and a peer evaluation system to determine competency.[50] This ensures that certification of measuring devices in one country is compatible with the certification process in other participating countries, allowing the trade of the measuring devices and the products that rely on them.
International Laboratory Accreditation Cooperation
The International Laboratory Accreditation Cooperation (ILAC) is an international organisation for accreditation agencies involved in the certification of conformity-assessment bodies.[51] It standardises accreditation practices and procedures, recognising competent calibration facilities and assisting countries developing their own accreditation bodies.[2] ILAC originally began as a conference in 1977 to develop international cooperation for accredited testing and calibration results to facilitate trade.[51] In 2000, 36 members signed the ILAC mutual recognition agreement (MRA), allowing members work to be automatically accepted by other signatories, and in 2012 was expanded to include accreditation of inspection bodies.[51][52] Through this standardisation, work done in laboratories accredited by signatories is automatically recognised internationally through the MRA.[53] Other work done by ILAC includes promotion of laboratory and inspection body accreditation, and supporting the development of accreditation systems in developing economies.[53]
Joint Committee for Guides in Metrology
The Joint Committee for Guides in Metrology (JCGM) is a committee which created and maintains two metrology guides: Guide to the expression of uncertainty in measurement (GUM)[54] and International vocabulary of metrology – basic and general concepts and associated terms (VIM).[33] The JCGM is a collaboration of eight partner organisations:[55]
- International Bureau of Weights and Measures (BIPM)
- International Electrotechnical Commission (IEC)
- International Federation of Clinical Chemistry and Laboratory Medicine (IFCC)
- International Organization for Standardization (ISO)
- International Union of Pure and Applied Chemistry (IUPAC)
- International Union of Pure and Applied Physics (IUPAP)
- International Organization of Legal Metrology (OIML)
- International Laboratory Accreditation Cooperation (ILAC)
The JCGM has two working groups: JCGM-WG1 and JCGM-WG2. JCGM-WG1 is responsible for the GUM, and JCGM-WG2 for the VIM.[56] Each member organization appoints one representative and up to two experts to attend each meeting, and may appoint up to three experts for each working group.[55]
National infrastructure
A national measurement system (NMS) is a network of laboratories, calibration facilities and accreditation bodies which implement and maintain a country's measurement infrastructure.[8][9] The NMS sets measurement standards, ensuring the accuracy, consistency, comparability, and reliability of measurements made in the country.[57] The measurements of member countries of the CIPM Mutual Recognition Arrangement (CIPM MRA), an agreement of national metrology institutes, are recognized by other member countries.[2] As of March 2018, there are 102 signatories of the CIPM MRA, consisting of 58 member states, 40 associate states, and 4 international organizations.[58]
Metrology institutes

A national metrology institute's (NMI) role in a country's measurement system is to conduct scientific metrology, realise base units, and maintain primary national standards.[2] An NMI provides traceability to international standards for a country, anchoring its national calibration hierarchy.[2] For a national measurement system to be recognized internationally by the CIPM Mutual Recognition Arrangement, an NMI must participate in international comparisons of its measurement capabilities.[9] BIPM maintains a comparison database and a list of calibration and measurement capabilities (CMCs) of the countries participating in the CIPM MRA.[59] Not all countries have a centralised metrology institute; some have a lead NMI and several decentralised institutes specialising in specific national standards.[2] Some examples of NMI's are the National Institute of Standards and Technology (NIST)[60] in the United States, the National Research Council (NRC)[61] in Canada, the Physikalisch-Technische Bundesanstalt (PTB) in Germany,[62] and the National Physical Laboratory (United Kingdom) (NPL).[63]
Calibration laboratories
Calibration laboratories are generally responsible for calibrations of industrial instrumentation.[9] Calibration laboratories are accredited and provide calibration services to industry firms, which provides a traceability link back to the national metrology institute. Since the calibration laboratories are accredited, they give companies a traceability link to national metrology standards.[2]
Accreditation bodies
An organisation is accredited when an authoritative body determines, by assessing the organisation's personnel and management systems, that it is competent to provide its services.[9] For international recognition, a country's accreditation body must comply with international requirements and is generally the product of international and regional cooperation.[9] A laboratory is evaluated according to international standards such as ISO/IEC 17025 general requirements for the competence of testing and calibration laboratories.[2] To ensure objective and technically-credible accreditation, the bodies are independent of other national measurement system institutions.[9] The National Association of Testing Authorities[64] in Australia and the United Kingdom Accreditation Service[65] are examples of accreditation bodies.
Impacts
Metrology has wide-ranging impacts on a number of sectors, including economics, energy, the environment, health, manufacturing, industry, and consumer confidence.[10][11] The effects of metrology on trade and the economy are two of its most-apparent societal impacts. To facilitate fair and accurate trade between countries, there must be an agreed-upon system of measurement.[11] Accurate measurement and regulation of water, fuel, food, and electricity are critical for consumer protection and promote the flow of goods and services between trading partners.[66] A common measurement system and quality standards benefit consumer and producer; production at a common standard reduces cost and consumer risk, ensuring that the product meets consumer needs.[11] Transaction costs are reduced through an increased economy of scale. Several studies have indicated that increased standardisation in measurement has a positive impact on GDP. In the United Kingdom, an estimated 28.4 per cent of GDP growth from 1921 to 2013 was the result of standardisation; in Canada between 1981 and 2004 an estimated nine per cent of GDP growth was standardisation-related, and in Germany the annual economic benefit of standardisation is an estimated 0.72% of GDP.[11]
Legal metrology has reduced accidental deaths and injuries with measuring devices, such as radar guns and breathalyzers, by improving their efficiency and reliability.[66] Measuring the human body is challenging, with poor repeatability and reproducibility, and advances in metrology help develop new techniques to improve health care and reduce costs.[67] Environmental policy is based on research data, and accurate measurements are important for assessing climate change and environmental regulation.[68] Aside from regulation, metrology is essential in supporting innovation, the ability to measure provides a technical infrastructure and tools that can then be used to pursue further innovation. By providing a technical platform which new ideas can be built upon, easily demonstrated, and shared, measurement standards allow new ideas to be explored and expanded upon.[11]
See also
- Accuracy and precision – Measures of observational error
- Dimensional metrology – Specialization
- Forensic metrology – Science of measurement applied to forensics
- Geometric dimensioning and tolerancing – System for defining and representing engineering tolerances
- Historical metrology – Study of measurement systems
- International vocabulary of metrology
- Length measurement – Ways in which length, distance or range can be measured
- Measurement (journal)
- Metrication – Conversion to the metric system of measurement
- Metrologia – Journal dealing with the scientific aspects of metrology
- Quantum metrology – Application of quantum entanglement to high-precision measurement
- Smart Metrology – Approach to industrial metrology
- Surface metrology – Measurement of small-scale features on surfaces
- Time metrology – Application of metrology for timekeeping
- World Metrology Day – Annual celebration of SI units
Notes
- ^ Equivalent to standard deviation if the uncertainty distribution is normal
References
- ^ "What is metrology? Celebration of the signing of the Metre Convention, World Metrology Day 2004". BIPM. 2004. Archived from the original on 2011-09-27. Retrieved 2018-02-21.
- ^ a b c d e f g h i j k l m n o p q r Collège français de métrologie [French College of Metrology] (2006). Placko, Dominique (ed.). Metrology in Industry – The Key for Quality (PDF). ISTE. ISBN 978-1-905209-51-4. Archived (PDF) from the original on 2012-10-23.
- ^ a b c d e f Goldsmith, Mike. "A Beginner's Guide to Measurement" (PDF). National Physical Laboratory. Archived (PDF) from the original on 29 March 2017. Retrieved 16 February 2017.
- ^ a b c d "History of measurement – from metre to International System of Units (SI)". La metrologie francaise. Archived from the original on 25 April 2011. Retrieved 28 February 2017.
- ^ a b "Resolution 12 of the 11th CGPM (1960)". Bureau International des Poids et Mesures. Archived from the original on 14 May 2013. Retrieved 28 February 2017.
- ^ a b c d e f Czichos, Horst; Smith, Leslie, eds. (2011). Springer Handbook of Metrology and Testing (2nd ed.). Springer. 1.2.2 Categories of Metrology. ISBN 978-3-642-16640-2. Archived from the original on 2013-07-01.
- ^ Collège français de métrologie [French College of Metrology] (2006). Placko, Dominique (ed.). Metrology in Industry – The Key for Quality (PDF). International Society for Technology in Education (ISTE). 2.4.1 Scope of legal metrology. ISBN 978-1-905209-51-4. Archived (PDF) from the original on 2012-10-23.
... any application of metrology may fall under the scope of legal metrology if regulations are applicable to all measuring methods and instruments, and in particular if quality control is supervised by the state.
- ^ a b "National Measurement System". National Physical Laboratory. Archived from the original on 15 February 2017. Retrieved 5 March 2017.
- ^ a b c d e f g "The National Quality Infrastructure" (PDF). The Innovation Policy Platform. Archived (PDF) from the original on 6 March 2017. Retrieved 5 March 2017.
- ^ a b "Metrology for Society's Challenges". EURAMET. Archived from the original on 12 March 2017. Retrieved 9 March 2017.
- ^ a b c d e f g Robertson, Kristel; Swanepoel, Jan A. (September 2015). The economics of metrology (PDF). Australian Government, Department of Industry, Innovation and Science. Archived (PDF) from the original on 7 March 2016. Retrieved 9 March 2017.
- ^ a b c d e f "History of Metrology". Measurement Science Conference. 17 June 2016. Archived from the original on 1 March 2017. Retrieved 28 February 2017.
- ^ Confucius (2016-08-29). Delphi Collected Works of Confucius - Four Books and Five Classics of Confucianism (Illustrated). Delphi Classics. ISBN 978-1-78656-052-0.
- ^ "History of Length Measurement". National Physical Laboratory. Archived from the original on 1 March 2017. Retrieved 28 February 2017.
- ^ "What is metrology?". BIPM. Archived from the original on 24 March 2017. Retrieved 23 February 2017.
- ^ "The BIPM key comparison database". BIPM. Archived from the original on 2013-09-28. Retrieved 26 Sep 2013.
- ^ Decision CIPM/105-13 (October 2016)
- ^ a b "New measurement will help redefine international unit of mass: Ahead of July 1 deadline, team makes its most precise measurement yet of Planck's constant". ScienceDaily. Retrieved 23 March 2018.
- ^ Crease, Robert P. (22 March 2011). "Metrology in the balance". Physics World. Institute of Physics. Retrieved 23 March 2018.
- ^ a b c de Silva, G. M. S (2012). Basic Metrology for ISO 9000 Certification (Online-Ausg. ed.). Oxford: Routledge. pp. 12–13. ISBN 978-1-136-42720-6. Archived from the original on 27 February 2018. Retrieved 17 February 2017.
- ^ International Vocabulary of Terms in Legal Metrology (PDF). Paris: OIML. 2000. p. 7. Archived from the original (PDF) on September 28, 2007.
- ^ a b Sharp, DeWayne (2014). Measurement, instrumentation, and sensors handbook (Second ed.). Boca Raton: CRC Press, Inc. ISBN 978-1-4398-4888-3.
- ^ WELMEC Secretariat. "WELMEC An introduction" (PDF). WELMEC. Archived (PDF) from the original on 28 February 2017. Retrieved 28 February 2017.
- ^ "SI base units". The NIST Reference on Constants, Units, and Uncertainty. National Institute of Standards and Technology. 12 April 2010. Archived from the original on 19 January 2017. Retrieved 15 February 2017.
- ^ a b c d e f g h i j The International System of Units (PDF), V3.01 (9th ed.), International Bureau of Weights and Measures, Aug 2024, ISBN 978-92-822-2272-0
- ^ a b "On the future revision of the SI". Bureau International des Poids et Mesures. Archived from the original on 15 February 2017. Retrieved 16 February 2017.
- ^ Kühne, Michael (22 March 2012). "Redefinition of the SI". Keynote address, ITS9 (Ninth International Temperature Symposium). Los Angeles: NIST. Archived from the original on 18 June 2013. Retrieved 1 March 2012.
- ^ "Realise". Oxford English Dictionary (Online ed.). Oxford University Press. (Subscription or participating institution membership required.)
- ^ International vocabulary of metrology—Basic and general concepts and associated terms (VIM) (PDF) (3rd ed.). International Bureau of Weights and Measures on behalf of the Joint Committee for Guides in Metrology. 2012. p. 46. Archived (PDF) from the original on 17 March 2017. Retrieved 1 March 2017.
- ^ Phillip Ostwald, Jairo Muñoz, Manufacturing Processes and Systems (9th Edition)John Wiley & Sons, 1997 ISBN 978-0-471-04741-4 page 616
- ^ Doiron, Ted; Beers, John. "The Gauge Block Handbook" (PDF). NIST. Retrieved 23 March 2018.
- ^ "e-Handbook of Statistical Methods". NIST/SEMATECH. Retrieved 23 March 2018.
- ^ a b c International vocabulary of metrology – basic and general concepts and associated terms (PDF) (3 ed.). Joint Committee on Guides for Metrology (JCGM). 2008. Archived from the original (PDF) on 2011-01-10. Retrieved 2014-06-13.
- ^ a b "Metrological Traceability for Meteorology" (PDF). World Meteorological Organization Commission for Instruments and Methods of Observation. Archived (PDF) from the original on 17 March 2017. Retrieved 2 March 2017.
- ^ Guide to the Evaluation of Measurement Uncertainty for Quantitative Test Results (PDF). Paris, France: EUROLAB. August 2006. p. 8. Archived (PDF) from the original on 23 November 2016. Retrieved 2 March 2017.
- ^ a b c Bell, Stephanie (March 2001). "A Beginner's Guide to Uncertainty of Measurement" (PDF). Technical Review- National Physical Laboratory (Issue 2 ed.). Teddington, Middlesex, United Kingdom: National Physical Laboratory. ISSN 1368-6550. Archived (PDF) from the original on 3 May 2017. Retrieved 2 March 2017.
- ^ "The Metre Convention". Bureau International des Poids et Mesures. Archived from the original on 26 September 2012. Retrieved 1 October 2012.
- ^ "General Conference on Weights and Measures". Bureau International des Poids et Mesures. 2011. Archived from the original on 26 September 2012. Retrieved 26 September 2012.
- ^ Proceedings of the 106th meeting (PDF). International Committee for Weights and Measures. Sèvres. 16–20 October 2017.
- ^ BIPM statement: Information for users about the proposed revision of the SI (PDF), archived from the original (PDF) on 2018-01-21, retrieved 2018-11-22
- ^ "Decision CIPM/105-13 (October 2016)". The day is the 144th anniversary of the Metre Convention.
- ^ Convention of the Metre (1875), Appendix 1 (Regulation), Article 8
- ^ "CIPM: International Committee for Weights and Measures". Bureau International des Poids et Mesures. 2011. Archived from the original on 24 September 2012. Retrieved 26 September 2012.
- ^ "Criteria for membership of the CIPM". Bureau International des Poids et Mesures. 2011. Archived from the original on 27 May 2012. Retrieved 26 September 2012.
- ^ "Mission, Role and Objectives" (PDF). BIPM. Archived from the original (PDF) on 6 October 2016. Retrieved 26 March 2018.
- ^ a b "International Prototype of the Kilogram". BIPM. Archived from the original on 12 March 2020. Retrieved 26 March 2018.
- ^ "Criteria for membership of a Consultative Committee". BIPM. Archived from the original on 26 March 2018. Retrieved 26 March 2018.
- ^ "Convention establishing an International Organisation of Legal Metrology" (PDF). 2000 (E). Paris: Bureau International de Métrologie Légale. Archived (PDF) from the original on 12 July 2014. Retrieved 24 March 2017.
{{cite journal}}: Cite journal requires|journal=(help) - ^ a b c "OIML Strategy" (PDF). OIML B 15 (2011 (E) ed.). Paris: Bureau International de Métrologie Légale. Archived (PDF) from the original on 2 December 2016. Retrieved 24 March 2017.
{{cite journal}}: Cite journal requires|journal=(help) - ^ a b "MAA certificates". OIML. Retrieved 25 March 2018.
- ^ a b c "ABOUT ILAC". International Laboratory Accreditation Cooperation. 27 February 2014. Archived from the original on 15 March 2017. Retrieved 24 March 2017.
- ^ "The ILAC Mutual Recognition Arrangement" (PDF). International Laboratory Accreditation Cooperation. Archived from the original (PDF) on 25 March 2017. Retrieved 24 March 2017.
- ^ a b "ILAC's Role International Laboratory Accreditation Cooperation". ILAC. 3 March 2014. Retrieved 25 March 2018.
- ^ JCGM 100:2008. Evaluation of measurement data – Guide to the expression of uncertainty in measurement, Joint Committee for Guides in Metrology. Archived 2009-10-01 at the Wayback Machine
- ^ a b Charter Joint Committee for Guides in Metrology (JCGM) (PDF). Joint Committee for Guides in Metrology. 10 December 2009. Archived (PDF) from the original on 24 October 2015. Retrieved 24 March 2017.
- ^ "Joint Committee for Guides in Metrology (JCGM)". Bureau International des Poids et Mesures. Archived from the original on 12 May 2017. Retrieved 24 March 2017.
- ^ "National Measurement System". National Metrology Center (NMC). 23 August 2013. Archived from the original on 6 March 2017. Retrieved 5 March 2017.
- ^ "BIPM – signatories". www.bipm.org. Bureau International des Poids et Mesures. Retrieved 24 March 2018.
- ^ "The BIPM key comparison database". Bureau International des Poids et Mesures. Archived from the original on 29 January 2017. Retrieved 5 March 2017.
- ^ "International Legal Organizational Primer". NIST. 14 January 2010. Retrieved 25 March 2018.
- ^ "Measurement science and standards – National Research Council Canada". National Research Council of Canada. Retrieved 25 March 2018.
- ^ "PTB". PTB. Retrieved 18 June 2023.
- ^ "Creating impact from science and engineering – National Physical Laboratory". National Physical Laboratory. 17 June 2017. Retrieved 25 January 2022.
- ^ "NATA – About Us". NATA. Retrieved 25 March 2018.
- ^ "About UKAS". UKAS. Retrieved 25 March 2018.
- ^ a b Rodrigues Filho, Bruno A.; Gonçalves, Rodrigo F. (June 2015). "Legal metrology, the economy and society: A systematic literature review". Measurement. 69: 155–163. Bibcode:2015Meas...69..155R. doi:10.1016/j.measurement.2015.03.028.
- ^ "Metrology for Society's Challenges – Metrology for Health". EURAMET. Archived from the original on 12 March 2017. Retrieved 9 March 2017.
- ^ "Metrology for Society's Challenges – Metrology for Environment". EURAMET. Archived from the original on 12 March 2017. Retrieved 9 March 2017.
External links
- Measurement Uncertainties in Science and Technology, Springer 2005
- Presentation about Product Quality planning that includes a typical industry "Dimensional Control Plan"
- Training in Metrology in Chemistry (TrainMiC)
- Measurement Science in Chemistry
Notes
This article is a direct transclusion of the Wikipedia article and therefore may not meet the same editing standards as LIMSwiki.


