Difference between revisions of "Journal:From command-line bioinformatics to bioGUI"
Shawndouglas (talk | contribs) (Saving and adding more.) |
Shawndouglas (talk | contribs) (Finished adding rest of content.) |
||
| (6 intermediate revisions by the same user not shown) | |||
| Line 19: | Line 19: | ||
|download = [https://peerj.com/articles/8111.pdf https://peerj.com/articles/8111.pdf] (PDF) | |download = [https://peerj.com/articles/8111.pdf https://peerj.com/articles/8111.pdf] (PDF) | ||
}} | }} | ||
==Abstract== | ==Abstract== | ||
[[Bioinformatics]] is a highly interdisciplinary field providing informatics applications for scientists from many disciplines. Installing and starting applications on the command line (CL) is inconvenient and inefficient for many scientists. Nonetheless, most methods are implemented with a command-line interface only. Providing a graphical user interface (GUI) for bioinformatics applications is one step toward routinely making CL-only applications more readily available to scientists, yielding a positive step toward more effective interdisciplinary work. With our bioGUI framework, we address two main problems of using CL bioinformatics applications. First, many tools work on UNIX-based systems only, while many scientists use Microsoft Windows. Second, scientists refrain from using CL tools, which, despite their reservations, could well support them in their research. With bioGUI install modules and templates, installing and using CL tools is made possible for most scientists, even on Windows, due to bioGUI’s support for Windows Subsystem for Linux. In addition, bioGUI templates can easily be created, making the bioGUI framework highly rewarding for developers. From the bioGUI repository it is possible to download, install, and use bioinformatics tools with just a few clicks. | [[Bioinformatics]] is a highly interdisciplinary field providing informatics applications for scientists from many disciplines. Installing and starting applications on the command line (CL) is inconvenient and inefficient for many scientists. Nonetheless, most methods are implemented with a command-line interface only. Providing a graphical user interface (GUI) for bioinformatics applications is one step toward routinely making CL-only applications more readily available to scientists, yielding a positive step toward more effective interdisciplinary work. With our bioGUI framework, we address two main problems of using CL bioinformatics applications. First, many tools work on UNIX-based systems only, while many scientists use Microsoft Windows. Second, scientists refrain from using CL tools, which, despite their reservations, could well support them in their research. With bioGUI install modules and templates, installing and using CL tools is made possible for most scientists, even on Windows, due to bioGUI’s support for Windows Subsystem for Linux. In addition, bioGUI templates can easily be created, making the bioGUI framework highly rewarding for developers. From the bioGUI repository it is possible to download, install, and use bioinformatics tools with just a few clicks. | ||
| Line 206: | Line 201: | ||
| style="background-color:white; padding-left:10px; padding-right:10px;"|✓ | | style="background-color:white; padding-left:10px; padding-right:10px;"|✓ | ||
| style="background-color:white; padding-left:10px; padding-right:10px;"| | | style="background-color:white; padding-left:10px; padding-right:10px;"| | ||
|- | |||
| style="background-color:white; padding-left:10px; padding-right:10px;"|Install hisat2<ref name="KimGraph19">{{cite journal |title=Graph-based genome alignment and genotyping with HISAT2 and HISAT-genotype |journal=Nature Biotechnology |author=Kim, D.; Paggi, J.M.; Park, C. et al. |volume=37 |issue=8 |page=907–15 |year=2019 |doi=10.1038/s41587-019-0201-4 |pmid=31375807}}</ref> | |||
| style="background-color:white; padding-left:10px; padding-right:10px;"|NGS transcriptomics | |||
| style="background-color:white; padding-left:10px; padding-right:10px;"|✓ | |||
| style="background-color:white; padding-left:10px; padding-right:10px;"|✓ | |||
|- | |||
| style="background-color:white; padding-left:10px; padding-right:10px;"|Install hmmer-3.1b2<ref name="WheelerNHMMER13">{{cite journal |title=nhmmer: DNA homology search with profile HMMs |journal=Bioinformatics |author=Wheeler, T.J.; Eddy, S.R. |volume=29 |issue=19 |page=2487-9 |year=2013 |doi=10.1093/bioinformatics/btt403 |pmid=23842809 |pmc=PMC3777106}}</ref> | |||
| style="background-color:white; padding-left:10px; padding-right:10px;"|Sequence analysis | |||
| style="background-color:white; padding-left:10px; padding-right:10px;"|✓ | |||
| style="background-color:white; padding-left:10px; padding-right:10px;"| | |||
|- | |||
| style="background-color:white; padding-left:10px; padding-right:10px;"|Install jellyfish-2.2.6<ref name="MarçaisAFast11" /> | |||
| style="background-color:white; padding-left:10px; padding-right:10px;"|NGS | |||
| style="background-color:white; padding-left:10px; padding-right:10px;"|✓ | |||
| style="background-color:white; padding-left:10px; padding-right:10px;"| | |||
|- | |||
| style="background-color:white; padding-left:10px; padding-right:10px;"|Install minimap2/miniasm/racon (gitHub) | |||
| style="background-color:white; padding-left:10px; padding-right:10px;"|Assembly (long-read) | |||
| style="background-color:white; padding-left:10px; padding-right:10px;"|✓ | |||
| style="background-color:white; padding-left:10px; padding-right:10px;"|✓ | |||
|- | |||
| style="background-color:white; padding-left:10px; padding-right:10px;"|Install MS-EmpiRe<ref name="AmmarMS-EmpiRe19" /> | |||
| style="background-color:white; padding-left:10px; padding-right:10px;"|NGS transcriptomics | |||
| style="background-color:white; padding-left:10px; padding-right:10px;"|✓ | |||
| style="background-color:white; padding-left:10px; padding-right:10px;"|✓ | |||
|- | |||
| style="background-color:white; padding-left:10px; padding-right:10px;"|Install PureSeqTM<ref name="WangPure19">{{cite journal |title=PureseqTM: efficient and accurate prediction of transmembrane topology from amino acid sequence only |journal=bioRxiv |author=Wang, Q.; Ni, C.-m., Li, Z. et al. |year=2019 |doi=10.1101/627307}}</ref> | |||
| style="background-color:white; padding-left:10px; padding-right:10px;"|Sequence analysis | |||
| style="background-color:white; padding-left:10px; padding-right:10px;"|✓ | |||
| style="background-color:white; padding-left:10px; padding-right:10px;"| | |||
|- | |||
| style="background-color:white; padding-left:10px; padding-right:10px;"|Install rMATS-3.2.5<ref name="ShenRMATS14">{{cite journal |title=rMATS: Robust and flexible detection of differential alternative splicing from replicate RNA-Seq data |journal=Proceedings of the National Academy of Sciences of the United States of America |author=Shen, S.; Park, J.W.; Lu, Z.X. et al. |volume=111 |issue=51 |year=2014 |doi=10.1073/pnas.1419161111 |pmid=25480548 |pmc=PMC4280593}}</ref> | |||
| style="background-color:white; padding-left:10px; padding-right:10px;"|NGS transcriptomics | |||
| style="background-color:white; padding-left:10px; padding-right:10px;"|✓ | |||
| style="background-color:white; padding-left:10px; padding-right:10px;"| | |||
|- | |||
| style="background-color:white; padding-left:10px; padding-right:10px;"|Install rnahybrid<ref name="RehmsmeierFast04">{{cite journal |title=Fast and effective prediction of microRNA/target duplexes |journal=RNA |author=Rehmsmeier, M.; Steffen, P.; Hochsmann, M. et al. |volume=10 |issue=10 |year=2004 |doi=10.1261/rna.5248604 |pmid=15383676 |pmc=PMC4280593}}</ref> | |||
| style="background-color:white; padding-left:10px; padding-right:10px;"|Sequence analysis | |||
| style="background-color:white; padding-left:10px; padding-right:10px;"|✓ | |||
| style="background-color:white; padding-left:10px; padding-right:10px;"|✓ | |||
|- | |||
| style="background-color:white; padding-left:10px; padding-right:10px;"|Install RSEM v1.3.0<ref name="Li">{{cite journal |title=RSEM: Accurate transcript quantification from RNA-Seq data with or without a reference genome |journal=BMC Bioinformatics |author=Li, B.; Dewey, C.N. |volume=12 |year=323 |doi=10.1186/1471-2105-12-323 |pmid=21816040 |pmc=PMC3163565}}</ref> | |||
| style="background-color:white; padding-left:10px; padding-right:10px;"|NGS transcriptomics | |||
| style="background-color:white; padding-left:10px; padding-right:10px;"|✓ | |||
| style="background-color:white; padding-left:10px; padding-right:10px;"| | |||
|- | |||
| style="background-color:white; padding-left:10px; padding-right:10px;"|Install samtools-1.3.1<ref name="LiTheSeq09">{{cite journal |title=The Sequence Alignment/Map format and SAMtools |journal=Bioinformatics |author=Li, H.; Handsaker, B.; Wysoker, A. et al. |volume=25 |issue=16 |pages=2078-9 |year=2009 |doi=10.1093/bioinformatics/btp352 |pmid=19505943 |pmc=PMC2723002}}</ref> | |||
| style="background-color:white; padding-left:10px; padding-right:10px;"|NGS | |||
| style="background-color:white; padding-left:10px; padding-right:10px;"|✓ | |||
| style="background-color:white; padding-left:10px; padding-right:10px;"|✓ | |||
|- | |||
| style="background-color:white; padding-left:10px; padding-right:10px;"|Install SPAdes v3.13.0<ref name="BankevichSPAdes12" /> | |||
| style="background-color:white; padding-left:10px; padding-right:10px;"|Assembly (hybrid) | |||
| style="background-color:white; padding-left:10px; padding-right:10px;"|✓ | |||
| style="background-color:white; padding-left:10px; padding-right:10px;"|✓ | |||
|- | |||
| style="background-color:white; padding-left:10px; padding-right:10px;"|Install StringTie v1.3.0<ref name="PerteaTranscript16" /> | |||
| style="background-color:white; padding-left:10px; padding-right:10px;"|NGS transcriptomics | |||
| style="background-color:white; padding-left:10px; padding-right:10px;"|✓ | |||
| style="background-color:white; padding-left:10px; padding-right:10px;"| | |||
|- | |||
| style="background-color:white; padding-left:10px; padding-right:10px;"|Install Top Monitor (ssh example) | |||
| style="background-color:white; padding-left:10px; padding-right:10px;"|Technical demo | |||
| style="background-color:white; padding-left:10px; padding-right:10px;"|✓ | |||
| style="background-color:white; padding-left:10px; padding-right:10px;"|✓ | |||
|- | |||
| style="background-color:white; padding-left:10px; padding-right:10px;"|Install Trimmomatic v0.36<ref name="BolgerTrimmo14" /> | |||
| style="background-color:white; padding-left:10px; padding-right:10px;"|NGS | |||
| style="background-color:white; padding-left:10px; padding-right:10px;"|✓ | |||
| style="background-color:white; padding-left:10px; padding-right:10px;"| | |||
|- | |||
| style="background-color:white; padding-left:10px; padding-right:10px;"|Install wtdbg2<ref name="RuanFast19" /> | |||
| style="background-color:white; padding-left:10px; padding-right:10px;"|Assembly (long-read) | |||
| style="background-color:white; padding-left:10px; padding-right:10px;"|✓ | |||
| style="background-color:white; padding-left:10px; padding-right:10px;"| | |||
|- | |||
| style="background-color:white; padding-left:10px; padding-right:10px;"|Install Circulator<ref name="HuntCirculator15" /> | |||
| style="background-color:white; padding-left:10px; padding-right:10px;"|Assembly | |||
| style="background-color:white; padding-left:10px; padding-right:10px;"|✓ | |||
| style="background-color:white; padding-left:10px; padding-right:10px;"|✓ | |||
|- | |||
|} | |||
|} | |||
===Benchmarking bioGUI templates=== | |||
Our benchmark comprises of four tasks. The first task is to assemble a bacterial genome from Oxford Nanopore long reads, for which the minimap2<ref name="LiMini18">{{cite journal |title=Minimap2: pairwise alignment for nucleotide sequences |journal=Bioinformatics |author=Li, H. |volume=34 |issue=18 |pages=3094–100 |year=2018 |doi=10.1093/bioinformatics/bty191 |pmid=29750242 |pmc=PMC6137996}}</ref>/miniasm<ref name="LiMini16">{{cite journal |title=Minimap and miniasm: Fast mapping and de novo assembly for noisy long sequences |journal=Bioinformatics |author=Li, H. |volume=32 |issue=14 |pages=2103–10 |year=2016 |doi=10.1093/bioinformatics/btw152 |pmid=27153593 |pmc=PMC4937194}}</ref>/racon<ref name="VaserFast17">{{cite journal |title=Fast and accurate de novo genome assembly from long uncorrected reads |journal=Genome Research |author=Vaser, R.; Sović, I.; Nagarajan, N. et al. |volume=27 |issue=5 |pages=737-46 |year=2017 |doi=10.1101/gr.214270.116 |pmid=28100585 |pmc=PMC5411768}}</ref> pipeline (available as install module from bioGUI) is used. The second task is the quantification of reads from a yeast mRNA sequencing project using Oxford Nanpore Reads and Illumina Reads (EMBL ENA studies PRJNA398797 [MinION] and SAMN00849440 [Illumina]). The quantification is performed using featureCounts from the subread package.<ref name="LiaoFeature14" /> The third task uses these results to compute differential gene expression. Differential gene expression analysis is performed using MS-EmpiRe in R (install module available<ref name="AmmarMS-EmpiRe19" />). Finally the fourth task uses RNAhybrid<ref name="RehmsmeierFast04" /> to predict miRNA binding sites (1,978 murine miRNAs) in 170 sequences of each 200 nt. | |||
The results are shown in Table 2. The given run times are wall clock times. The peak RAM consumption has been sampled from the process viewer on the given operating systems (Task Manager on Windows, top on Linux and Mac OS). | |||
{| | |||
| STYLE="vertical-align:top;"| | |||
{| class="wikitable" border="1" cellpadding="5" cellspacing="0" width="60%" | |||
|- | |||
| style="background-color:white; padding-left:10px; padding-right:10px;" colspan="9"|'''Table 2.''' Benchmarking results for the four selected tasks (see Benchmarking bioGUI templates within the Results section) on the described hardware (see Table A1 in Appendix section). All runs are started via bioGUI. | |||
|- | |||
|- | |||
! style="background-color:#e2e2e2; padding-left:10px; padding-right:10px;" rowspan="2"|Task | |||
! style="background-color:#e2e2e2; padding-left:10px; padding-right:10px;" colspan="2"|Linux server | |||
! style="background-color:#e2e2e2; padding-left:10px; padding-right:10px;" colspan="2"|Lenovo server | |||
! style="background-color:#e2e2e2; padding-left:10px; padding-right:10px;" colspan="2"|Surface Book | |||
! style="background-color:#e2e2e2; padding-left:10px; padding-right:10px;" colspan="2"|MacBook Air | |||
|- | |||
! style="background-color:#e2e2e2; padding-left:10px; padding-right:10px;"|Time | |||
! style="background-color:#e2e2e2; padding-left:10px; padding-right:10px;"|Peak RAM | |||
! style="background-color:#e2e2e2; padding-left:10px; padding-right:10px;"|Time | |||
! style="background-color:#e2e2e2; padding-left:10px; padding-right:10px;"|Peak RAM | |||
! style="background-color:#e2e2e2; padding-left:10px; padding-right:10px;"|Time | |||
! style="background-color:#e2e2e2; padding-left:10px; padding-right:10px;"|Peak RAM | |||
! style="background-color:#e2e2e2; padding-left:10px; padding-right:10px;"|Time | |||
! style="background-color:#e2e2e2; padding-left:10px; padding-right:10px;"|Peak RAM | |||
|- | |||
| style="background-color:white; padding-left:10px; padding-right:10px;"|Assembly | |||
| style="background-color:white; padding-left:10px; padding-right:10px;"|10:12 min | |||
| style="background-color:white; padding-left:10px; padding-right:10px;"|6.8 GB | |||
| style="background-color:white; padding-left:10px; padding-right:10px;"|23:00 min | |||
| style="background-color:white; padding-left:10px; padding-right:10px;"|6.5 GB | |||
| style="background-color:white; padding-left:10px; padding-right:10px;"|30:00 min | |||
| style="background-color:white; padding-left:10px; padding-right:10px;"|6.5 GB | |||
| style="background-color:white; padding-left:10px; padding-right:10px;"|44:30 min | |||
| style="background-color:white; padding-left:10px; padding-right:10px;"|6.5 GB | |||
|- | |||
| style="background-color:white; padding-left:10px; padding-right:10px;"|featureCounts (MinION) | |||
| style="background-color:white; padding-left:10px; padding-right:10px;"|00:38 min | |||
| style="background-color:white; padding-left:10px; padding-right:10px;"|20 MB | |||
| style="background-color:white; padding-left:10px; padding-right:10px;"|00:54 min | |||
| style="background-color:white; padding-left:10px; padding-right:10px;"|18 MB | |||
| style="background-color:white; padding-left:10px; padding-right:10px;"|01:12 min | |||
| style="background-color:white; padding-left:10px; padding-right:10px;"|18 MB | |||
| style="background-color:white; padding-left:10px; padding-right:10px;"|01:30 min | |||
| style="background-color:white; padding-left:10px; padding-right:10px;"|18 MB | |||
|- | |||
| style="background-color:white; padding-left:10px; padding-right:10px;"|featureCounts (Illumina) | |||
| style="background-color:white; padding-left:10px; padding-right:10px;"|01:13 min | |||
| style="background-color:white; padding-left:10px; padding-right:10px;"|28 MB | |||
| style="background-color:white; padding-left:10px; padding-right:10px;"|01:41 min | |||
| style="background-color:white; padding-left:10px; padding-right:10px;"|25 MB | |||
| style="background-color:white; padding-left:10px; padding-right:10px;"|02:22 min | |||
| style="background-color:white; padding-left:10px; padding-right:10px;"|25 MB | |||
| style="background-color:white; padding-left:10px; padding-right:10px;"|02:30 min | |||
| style="background-color:white; padding-left:10px; padding-right:10px;"|25 MB | |||
|- | |||
| style="background-color:white; padding-left:10px; padding-right:10px;"|DE quantification (MinION) | |||
| style="background-color:white; padding-left:10px; padding-right:10px;"|00:19 min | |||
| style="background-color:white; padding-left:10px; padding-right:10px;"|0.7 GB | |||
| style="background-color:white; padding-left:10px; padding-right:10px;"|00:25 min | |||
| style="background-color:white; padding-left:10px; padding-right:10px;"|0.6 GB | |||
| style="background-color:white; padding-left:10px; padding-right:10px;"|00:28 min | |||
| style="background-color:white; padding-left:10px; padding-right:10px;"|0.6 GB | |||
| style="background-color:white; padding-left:10px; padding-right:10px;"|00:42 min | |||
| style="background-color:white; padding-left:10px; padding-right:10px;"|0.6 GB | |||
|- | |||
| style="background-color:white; padding-left:10px; padding-right:10px;"|DE quantification (Illumina) | |||
| style="background-color:white; padding-left:10px; padding-right:10px;"|00:14 min | |||
| style="background-color:white; padding-left:10px; padding-right:10px;"|0.5 GB | |||
| style="background-color:white; padding-left:10px; padding-right:10px;"|00:19 min | |||
| style="background-color:white; padding-left:10px; padding-right:10px;"|0.4 GB | |||
| style="background-color:white; padding-left:10px; padding-right:10px;"|00:20 min | |||
| style="background-color:white; padding-left:10px; padding-right:10px;"|0.4 GB | |||
| style="background-color:white; padding-left:10px; padding-right:10px;"|00:31 min | |||
| style="background-color:white; padding-left:10px; padding-right:10px;"|0.4 GB | |||
|- | |||
| style="background-color:white; padding-left:10px; padding-right:10px;"|RNAhybrid | |||
| style="background-color:white; padding-left:10px; padding-right:10px;"|07:35 min | |||
| style="background-color:white; padding-left:10px; padding-right:10px;"|19 MB | |||
| style="background-color:white; padding-left:10px; padding-right:10px;"|23:00 min | |||
| style="background-color:white; padding-left:10px; padding-right:10px;"|18 MB | |||
| style="background-color:white; padding-left:10px; padding-right:10px;"|13:00 min | |||
| style="background-color:white; padding-left:10px; padding-right:10px;"|18 MB | |||
| style="background-color:white; padding-left:10px; padding-right:10px;"|16:55 min | |||
| style="background-color:white; padding-left:10px; padding-right:10px;"|18 MB | |||
|- | |||
|} | |||
|} | |||
==Discussion== | |||
bioGUI is a framework for easy GUI-based usage of CL applications in the life sciences. Using bioGUI, high-quality CL applications can be made accessible to as many researchers as possible. This is achieved by lowering the hurdles to overcome for using bioinformatics applications, particularly on Windows. | |||
===Use-case analysis=== | |||
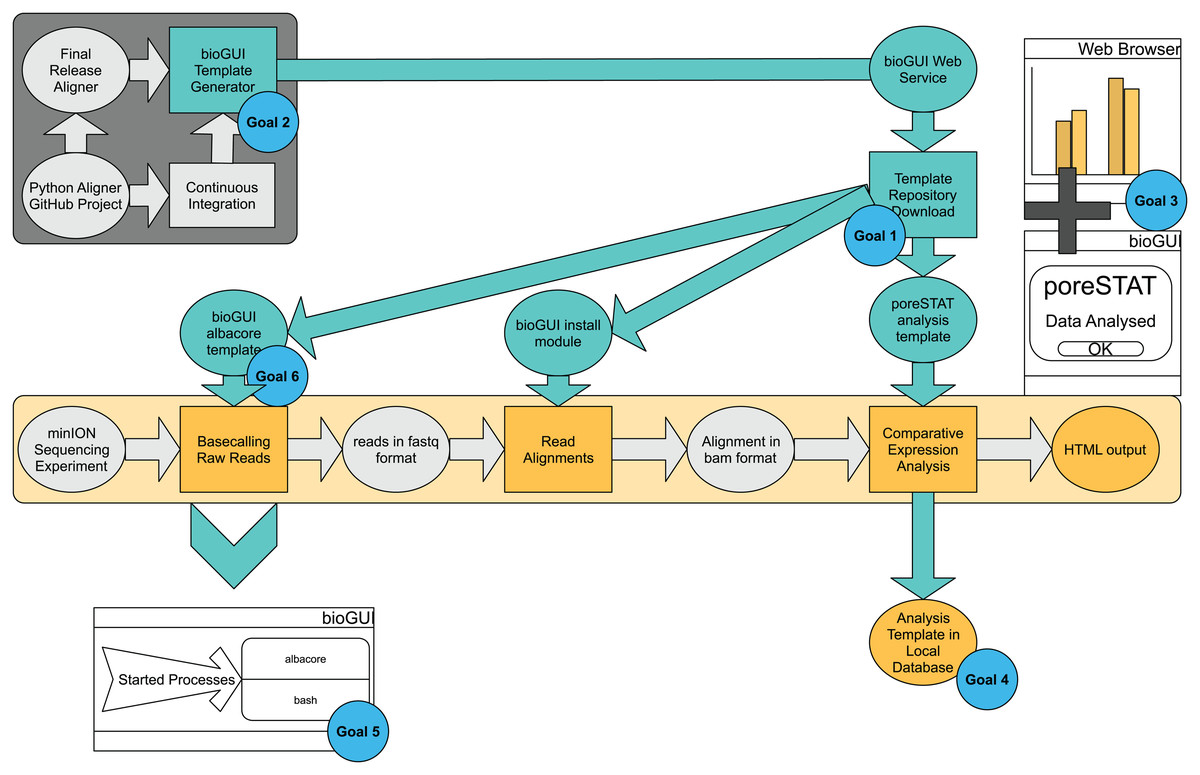
Our use-case analysis (Appendix section “Use cases”) has revealed several requirements for bioGUI (see the section “Methods”) to enable the user to perform the sequencing analysis and to allow the developer to rapidly create a template (Fig. 2). | |||
[[File:Fig2 Joppich PeerJ2019 7.jpg|900px]] | |||
{{clear}} | |||
{| | |||
| STYLE="vertical-align:top;"| | |||
{| border="0" cellpadding="5" cellspacing="0" width="900px" | |||
|- | |||
| style="background-color:white; padding-left:10px; padding-right:10px;"| <blockquote>'''Figure 2.''' bioGUI use-case study, from a developer’s and user’s perspective, performed on an exemplary RNAseq analysis workflow. The dark-gray underlayed tasks represent the developer’s tasks, and the bright-yellow part represents the analysis pipeline the user wants to execute. Tasks requiring user-action are shown as rectangles and intermediate results are shown in ellipses. Cyan ellipses denote solutions/results (e.g., template repository) offered by bioGUI. bioGUI starts sub-processes for each task, such that the overhead for any started processes is as small as possible. Upon finishing a task or pipeline, bioGUI can display a notification and open generated output.</blockquote> | |||
|- | |||
|} | |||
|} | |||
An easy installation (goal 1) is given through the availability of install modules, which can be downloaded from the bioGUI repository and started via the GUI. These also allow additional inputs (e.g., Python wheels for albacore, goal 6). | |||
The install modules combine the installation of an application and the creation of the actual GUI template. If the developers employ automatic testing of their software (e.g., build checks with [https://travis-ci.org/ Travis]), the install part resembles a Travis container setup (goal 2): dependencies and the application itself are installed into an operating system. Even if not, most bioinformaticians extensively use Ubuntu and/or bash scripts. Thus writing a script to install dependencies is not a significantly hard workload. We have reached a seamless and time-efficient creation of templates using an XML-based DSL. XML is particularly helpful as it allows to specify hierarchies and attributes to objects. Using our template generator for CWL and python3-argparse, bioGUI templates can be created even faster (goal 2). The templates are highly flexible in the creation of CL parameters, also due to providing script nodes. By providing install modules and templates, high-quality open-source bioinformatics applications become more accessible to the community. | |||
The bioGUI application is cross-platform compatible and only requires a few megabytes of disk space (goal 5). bioGUI implements several possibilities to execute applications (see Fig. A4, in the Appendix). In general, the only runtime overhead involved is the creation of a bash process, which starts the actual program with the assembled CL arguments (goal 5). bioGUI, being a local stand-alone application, has the possibility to target both locally installed and web-based applications, reachable within a controlled environment and with large data. In addition, bioGUI also supports the use of Docker containers, for cases where all other options fail. | |||
The UI can be made easily understandable (goal 3). Using text labels, the user can get help on inputs (if specified by the developer), links can be used to provide further information, and, most importantly, tooltips could also hint the user to which information is needed at a certain step. | |||
Finally, completed templates can be saved via the "Save Template" button in bioGUI, and all available templates can be filtered (goal 4). This enables a user to keep track of performed analyses, and it makes results more reproducible because parameters are saved. Having the possibility to save templates also allows users to easily repeat an analysis with the same parameters. Additionally, using the bioGUI repository, templates can easily be shared among users, making it easier to standardize runs among different users or even institutes. | |||
An anonymous survey (with 10 participants) about common problems in using bioinformatics software was also conducted among colleagues (''n'' = 4) and undergraduate students or collaborators from the life sciences (''n'' = 6, short: collaborators). The results are available in the Appendix section. | |||
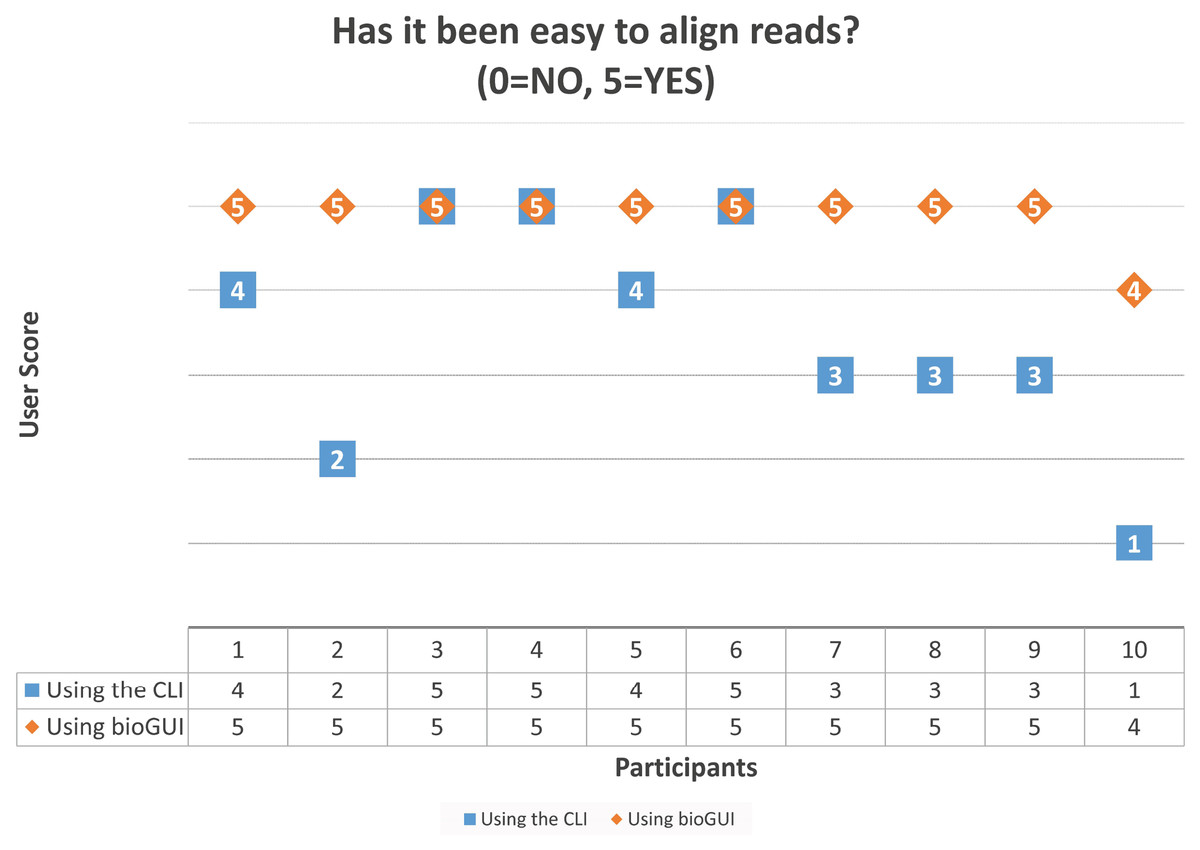
We asked “What were the most cumbersome tasks in accessing and using the software?”, referring to recently used bioinformatics software by the participants. Eight of the 10 participants answered that finding parameters or using the software was cumbersome. This shows that the selected goals for bioGUI address actual problems faced by both experts and regular users. We further asked the participants to install and use graphmap<ref name="SovićFast16" />, which was selected because it is reasonably easy to install and use. First the participants were asked to install the tool using the CLI as well as via bioGUI. For this task, all instructions have been provided. The question “Has the installation process been easy?” (0 = No, 5 = Yes) has been answered with an average score of 4.4 for the CLI and 4.8 for bioGUI. Then the participants were asked to align the given reads against a given reference genome, without giving the instructions. Again we asked “Has it been easy to align the reads?” (0 = No, 5 = Yes). Here the CLI scored a 3.5 on average and bioGUI a 4.9. (Fig. A6). This coincidences with the answer to our question “Overall: Which interface was easier to use in your opinion?” (0 = CLI, 5 = GUI). Here the average score was 4. Bioinformaticians and collaborators answered differently: the average bioinformatician was undecided on which interface was easier to use (average 3), but non-bioinformaticians preferred the GUI over the CLI (average 4.5). | |||
The survey indicates that there are problems with bioinformatics software regarding installation and usage of CLI tools. These problems can be reduced by providing a GUI for these programs. The more experienced a user is on the CL, the less impact a GUI has. But particularly for non-experts on the CL, a GUI makes it easier to use a program. | |||
===bioGUI repository=== | |||
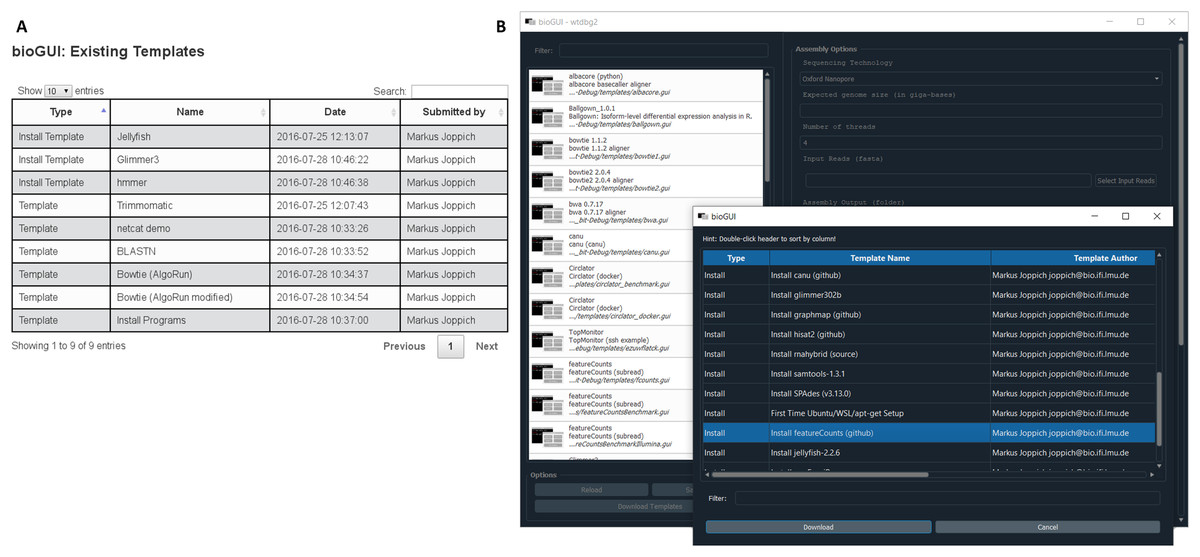
We provide a repository of preconfigured templates on our website (see Fig. A5, in the Appendix), where authors and users can search for and browse existing templates or submit new ones. bioGUI can access uploaded templates and save them directly for use. Install modules are provided specifically for WSL and Ubuntu users, which manages dependency resolution and installs applications (locally) onto the user’s device. This currently works in any environment using the aptitude (apt) package manager, but users can submit templates which also support other environments, since install modules are versatile bash scripts. On Mac OS, some install modules support Homebrew for template installation. Install modules download and may severely alter a system (especially if the sudo password is supplied). Thus, submitted install modules are manually curated and are only accessible when no security threat has been identified. | |||
The major goal of bioGUI is to enable any scientist to use bioinformatics applications. While we extend the repository on a regular basis depending on our own use, users can also request new templates for applications relevant to them. | |||
===Availability and extensibility=== | |||
bioGUI is open-source software, and users or institutions can either use our global bioGUI repository or deploy a custom repository, for example, one which is only reachable within an institution. | |||
bioGUI is [https://github.com/mjoppich/bioGUI available on GitHub]. Both source code as well as pre-built binary distributions (for Microsoft Windows, Linux, and Mac OS) are available. While bioGUI will run on any Linux distribution, install modules currently use mainly aptitude as a package manager (e.g., Ubuntu, debian-based distributions). If used on Windows, the same applies for the used WSL-application (Ubuntu 18.04 is recommended). bioGUI has been tested on Microsoft Windows 10, build 17763. On Mac OS, bioGUI uses [https://brew.sh/ Homebrew] to install dependencies. Homebrew does not support a silent, non-interactive installation: the user has to install Homebrew before running the "First time setup for Mac OS" install module, which will then install the most common dependencies. | |||
While a number of use cases and corresponding components are already included in bioGUI, we encourage users to contribute on GitHub by either pushing their own extensions or opening feature requests. Further documentation (installation and setup guide, how to write templates) is also available via [https://biogui.readthedocs.io/en/latest/index.html ReadTheDocs]. | |||
===Benchmarking bioGUI templates=== | |||
bioGUI starts a subprocess for each executed program. Thus, the only overhead created by bioGUI itself is the one for running the GUI, which creates less than 1% CPU usage, allocates less than 50 MB, and only performs IO operations when loading a new template (assessed via Sysinternals Process Explorer [Microsoft Sysinternals, 2019]). | |||
Nonetheless, we have been interested in demonstrating that many bioinformatics tasks do not require a dedicated server setup but can be performed on regular laptop computers. We thus benchmarked four typical tasks performed using bioGUI. | |||
The selected tasks allow a good overview of different demands: Tasks 1 (assembly) and 3 (differential expression analysis) are CPU-bound tasks, while tasks 2 (feature counting) and 4 (miRNA target prediction) are IO-bound. Particularly, Task 2 has a high load of read operations, and Task 4 has a high demand of write operations. We compare these tasks on a dedicated Linux server, one rather powerful Lenovo T470p laptop computer, one Surface Book laptop computer (resource-wise a typical laboratory laptop), and one MacBook Air. The computer specifications are listed in the Table A1 (see Appendix) and results are shown in Table 2 (above). Even though we have not included the alignment of the Illumina yeast reads in this benchmark, it should be noted that this task also runs well on laptop computers. On the Lenovo laptop, the alignment of the SRR453566 sample, consisting of 5,725,730 paired reads, has a peak RAM consumption of 34 MB and took 13:50 minutes, while the Surface Book is even faster at less than eight minutes. This presumably can be explained due to different SSD speeds. | |||
The results in Table 2 (above) show that even computationally low-end computers can run bioinformatics tools. More interestingly, these results show that the WSL allows the execution of interesting bioinformatic tools. It can be seen that WSL is slow for IO operations, but it has a comparable speed for in-memory operations. Particularly, tools requiring a lot of IO are considerably faster on the Linux Server (Assembly, RNAhybrid), while the computationally expensive tools like MS-EmpiRe<ref name="AmmarMS-EmpiRe19" /> and featureCounts<ref name="LiaoFeature14" /> run within similar times. | |||
==Conclusion== | |||
The bioGUI framework makes it easy to develop, provide, and use GUIs for CL applications. Particularly for non-computer experts, using CLIs is cumbersome. Providing a GUI and/or install modules increases accessibility to high-quality bioinformatics applications for these users. bioGUI creates a cross-platform GUI experience for many open-source bioinformatics applications. In particular, bioGUI enables the deployment of academic bioinformatics applications to Microsoft Windows workstations and laptops, as well as Linux or Mac OS. | |||
The separation of the GUI components and the program logic allows for the creation of templates in two steps. First, the template developer adds input elements to the window and, second, assembles these inputs according to the needs of the application back into CL arguments. This way almost any CL application can be used with a GUI, enabling many more researchers to use open-source tools. Providing install modules to make Unix applications available to Microsoft Windows users (via WSL) supports this goal. | |||
bioGUI can not always replace dedicated GUIs. A tailored UI will still be more usable and user-friendly than any generic solution can be. We experienced this in our use case: certain tasks (e.g., selecting options) require special solutions, let alone from displaying or interpreting the results. However, especially with the install module concept, we aim to provide a seamless installation and create the possibility to run CL applications by all scientists. Using the bioGUI framework, simple GUIs can be constructed. But these simple GUIs already help to make bioinformatic tools more accessible by making execution and usage of these tools more comfortable. | |||
Using bioGUI, it becomes a simple exercise to use supported CL applications from a GUI. Currently, there are already installed modules and templates for more than 25 applications in our bioGUI repository. bioGUI lowers the burden to use excellent applications, allowing more scientists a better analysis of their data. With bioGUI, it is not necessary to understand how to use and navigate on the CL; instead, the focus is set on the applications, its method and parameters, and finally the data. | |||
==Appendix== | |||
===Use cases=== | |||
====Non-computer expert==== | |||
Many researchers work in small labs without any significant IT support. The computers in their labs mostly run Microsoft Windows, and PhD students often have to bring their own devices (because the institute does not provide such working devices). Particularly in the life sciences, users can profit greatly from existing open-source software. However, installing major bioinformatics applications on such lab computers often poses a problem: administrators (if existent) have little time to deploy new applications, or there is no support in installing new applications at all. If the users are not computer experts, installing and using command line (CL) tools may be cumbersome for them (see the user surveys in this appendix). While there are users that can use the CL efficiently, the cited literature and our personal experience shows that there are many users who do not feel comfortable on the CL. This does not mean that they don’t want to learn it or are incapable of learning it, but their focus simply does not lie in learning to use the CL. Instead, they want to get the results for their data fast, reliably, and without issue. One of these users is Luisa. | |||
Oxford Nanopore Sequencing is becoming more and more popular, and even the sequencing hardware can be found in more and more biological laboratories, like in Luisa’s. Particularly important for MinION sequencing is the post-processing of the actual raw read data. While in previous versions base-calling was directly performed in the cloud by Oxford Nanopore, this has now been pushed back to the client side. Thus, despite having the sequencing data on her laptop, Luisa must still retrieve the sequences herself, using, for instance, the Albacore basecaller (if they don’t want to rely on LiveBasecalling). Unfortunately, like many bioinformatics packages, the basecaller only comes as a python CL program. Additionally, the download is only available as a Python wheel, which means there is no UI-based setup available. Luisa thus needs assistance for the installation of the Python wheel, as well as starting the basecalling process. After the reads are basecalled, reads need to be aligned to a reference genome. While reference genomes in a correct format exist on her lab computer (or can easily be downloaded from the web), the CL program to map the reads is available only from GitHub to be installed from source. Luisa has trouble using the CL to clone the repository, compile, and use the CL application. | |||
Luisa does not require a custom analysis of her data but rather wants to initially screen her data in a simple, basic, and robust analysis. She is mostly busy in her lab, hence an analysis has to be prepared fast, and parameters should be stored for later reference. For this, a local searchable database of saved templates is needed. | |||
====Software developers==== | |||
A developer finished his sequence alignment program. The project is already published on GitHub and in a journal, but only a few people start using it. From the issues and feature requests on GitHub it can be seen that mainly other bioinformaticians use the program. Thus, the developer decides that the program should be accessible to more researchers and looks for ways to make the program usable by everyone. Since the program is written in Python, it is cross-platform compatible. However, it is noticed that domain experts do not install and use the program. Thus the developer must look for an easy way to distribute the application and make it accessible to more researchers. The developer’s time is limited, having other projects waiting. There is also little support for developing a GUI from colleagues, as they have different views on the extent of autonomy a wet lab researcher should have regarding sequencing analysis. | |||
===bioGUI paper mockup=== | |||
[[File:FigA1 Joppich PeerJ2019 7.jpg|900px]] | |||
{{clear}} | |||
{| | |||
| STYLE="vertical-align:top;"| | |||
{| border="0" cellpadding="5" cellspacing="0" width="900px" | |||
|- | |||
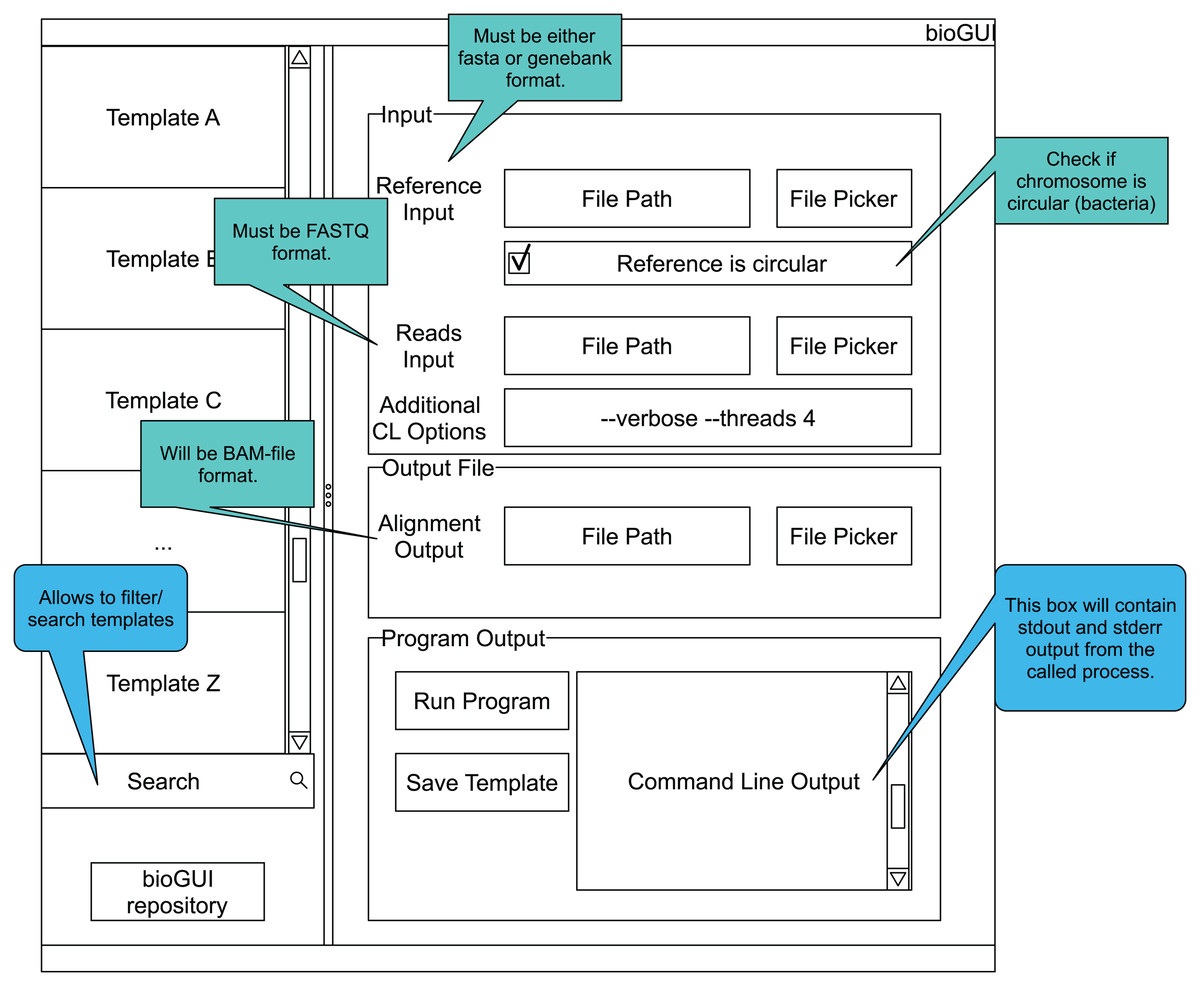
| style="background-color:white; padding-left:10px; padding-right:10px;"| <blockquote>'''Figure A1.''' bioGUI mockup showing the elements a template could be made of. The GUI has a searchable list of installed templates as well as a link to our repository of templates. The right side is reserved to the currently displayed GUI template. Here a structured view of the available parameters, as well as hints for filling these, is shown to the user. Finally, the user has the possibility to run the program by clicking a button and to see the program’s output.</blockquote> | |||
|- | |||
|} | |||
|} | |||
===Extending templates with script nodes=== | |||
Often it is required to perform string manipulations (e.g., remove file extensions) for CL arguments. For instance, the example below takes as input a HISAT2 index file and removes the file extension, such that the index will be accepted by HISAT2. For evaluation of this node, the <tt>evaluate</tt> function is called with the <tt>argv</tt> references as input parameters. The last return value of the script’s call stack is taken as the output value of the script -node. | |||
'''Listing 1.''' bioGUI script node with LUA function example. Upon evaluating this node, the evaluate function will be called with the arguments listed in the <tt>argv</tt> attribute of the script node. | |||
<code><script id=“hisat_index_rel” argv=“${hisat_index_rel_raw}”> | |||
<![CDATA[ | |||
function evaluate(arg1) | |||
if (string.match(arg1, “.%d.ht2$”)) then | |||
return(string.sub(arg1, 0, arg1:find(“.%d.ht2$”)-1)) | |||
end | |||
return(arg1) | |||
end | |||
]]> | |||
</script></code> | |||
===Evaluating a bioGUI template=== | |||
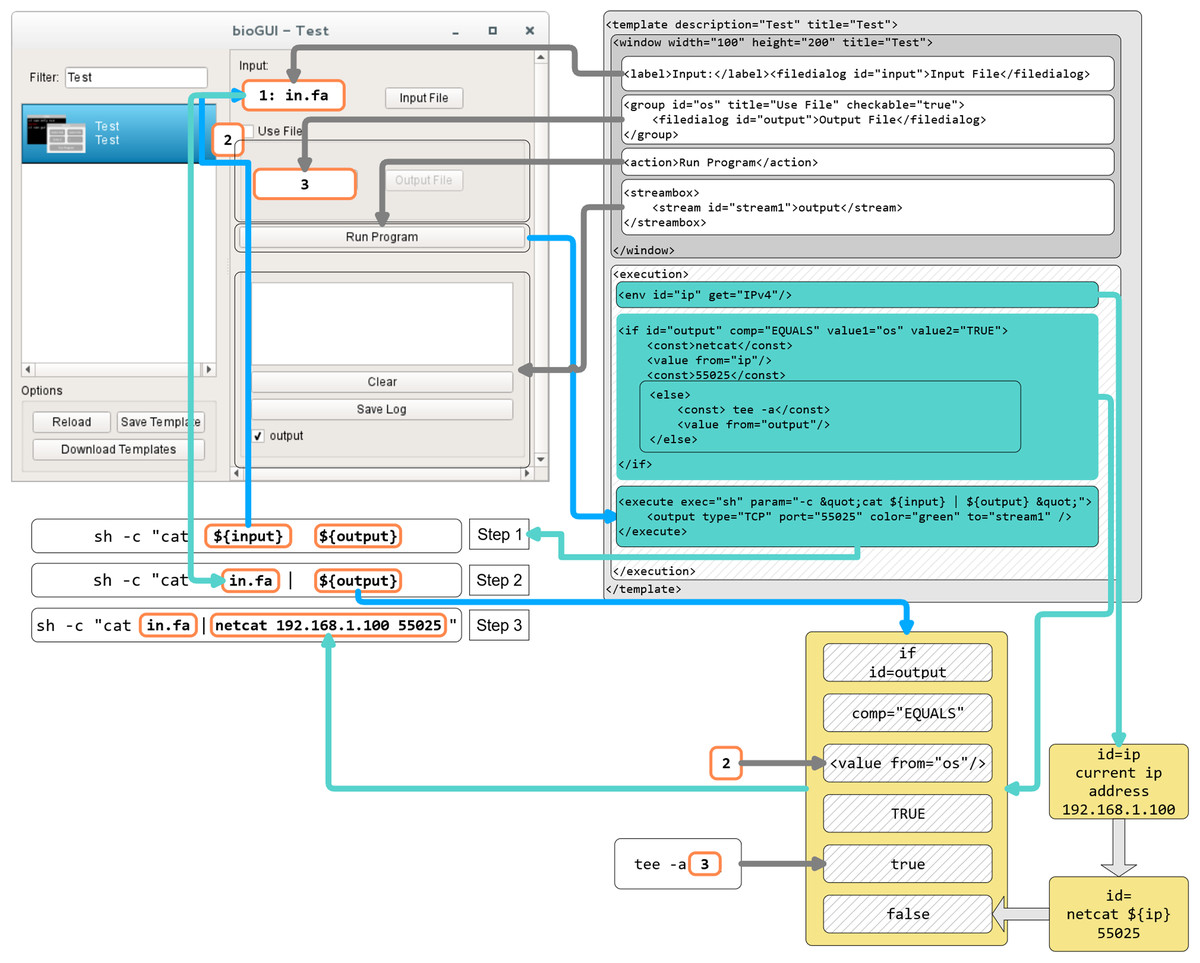
In Fig. A2, the process of assembling a CL call from the shown bioGUI template is explained. First, the creation of the <tt><window></tt> model (dark gray) will be explained, followed by the creation of the CL arguments using the <tt><execution></tt> model (shaded). | |||
[[File:FigA2 Joppich PeerJ2019 7.jpg|900px]] | |||
{{clear}} | |||
{| | |||
| STYLE="vertical-align:top;"| | |||
{| border="0" cellpadding="5" cellspacing="0" width="900px" | |||
|- | |||
| style="background-color:white; padding-left:10px; padding-right:10px;"| <blockquote>'''Figure A2.''' Template construction and evaluation in bioGUI. First, the dark gray window part is evaluated to create the GUI. Once the user clicks the run button, the execution part of the template (shaded) is executed by constructing and starting the assembled system call. This system call is constructed in three steps by replacing variables with evaluated terms from the user’s input. Blue lines indicate the visual element a returned value (cyan lines) is taken from. Helper/intermediate nodes to be evaluated are shown in light yellow.</blockquote> | |||
|- | |||
|} | |||
|} | |||
The window component consists of four different components, which are grouped in a vertical layout (default for window component). A label describing the input file dialog is placed on the main window, followed by the actual file dialog with ID input. Then a group box with title and a checkable status is created, which contains an output file dialog. Finally, the action button, which starts the CL call assembly and the subprocess of this program, and the text output elements are created. | |||
When the user has entered all desired data and clicks the action button, the execution phase defined by the execution model will be launched. Therefore the program defined in the execute element is started. For this, the parameters (param) must be assembled. Any text within <tt>${var}</tt> is interpreted as a reference to a variable "var" or the value of a GUI element with id "var." Thus, the CL is successively assembled. At first the <tt>${input}</tt> element is interpreted and retrieves the value from the input file dialog as this element matches the id. Next the <tt>${output}</tt> is interpreted. The <tt>${output}</tt> refers to an "if" construct in the execution part, which compares the value of the element with id "os" to the string "TRUE" (which indicated whether the groupbox is checked). If this value is true, this node evaluates to <tt>netcat 192.168.1.100 55025</tt>, otherwise to <tt>tee -a {output file path}</tt>. Finally, the program "sh" is executed with the created CL arguments. For instance, if the group box is checked, the <tt>sh -c “cat inputFile | netcat 192.168.1.100 55025”</tt> will be executed. A full reference of all input types as well as all execution nodes is available online. | |||
In fact, the evaluation of the execution network resembles the simulation of a petri net (Fig. A3). Each node in the execution network is a place, and its modification/function is the transition, which requires values for all its input places, to generate the output token. | |||
[[File:FigA3 Joppich PeerJ2019 7.jpg|1000px]] | |||
{{clear}} | |||
{| | |||
| STYLE="vertical-align:top;"| | |||
{| border="0" cellpadding="5" cellspacing="0" width="1000px" | |||
|- | |||
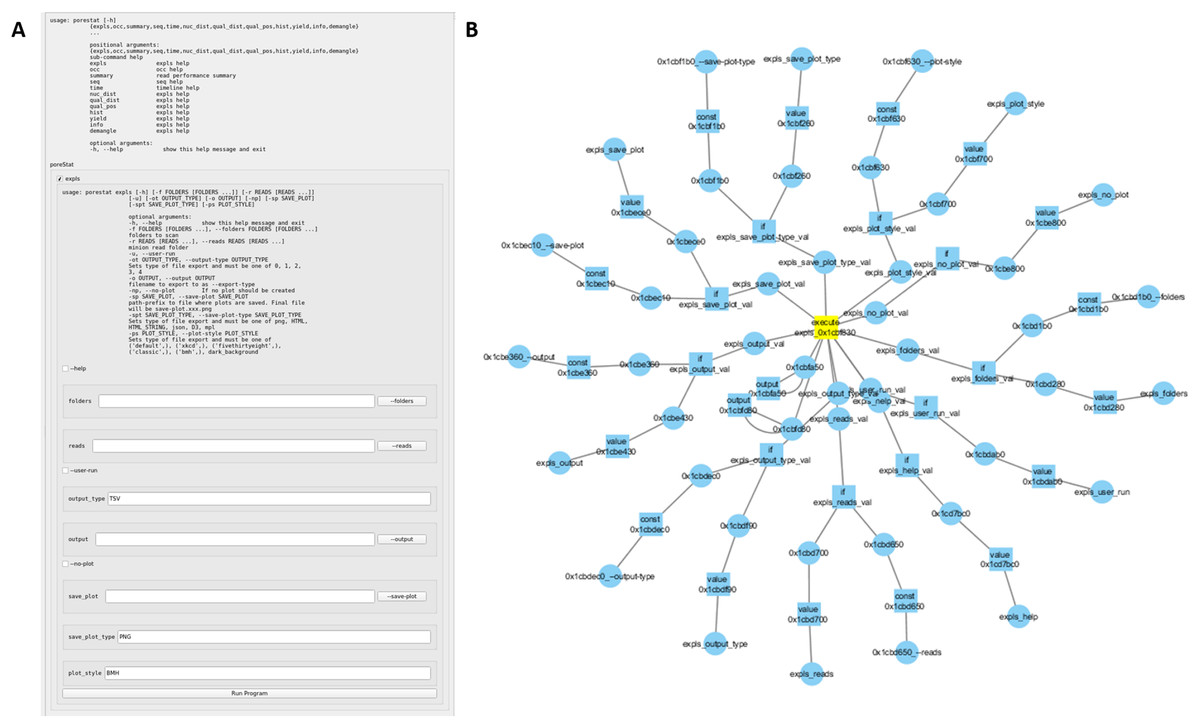
| style="background-color:white; padding-left:10px; padding-right:10px;"| <blockquote>'''Figure A3.''' ('''A''') An automatically generated bioGUI template from the poreSTAT (Internal tool for minION sequencing analysis) python argument parser. ('''B''') The resulting execution network for the bioGUI template shown in (A). The central node represents the fully assembled CL argument (yellow).</blockquote> | |||
|- | |||
|} | |||
|} | |||
===Running programs via bioGUI=== | |||
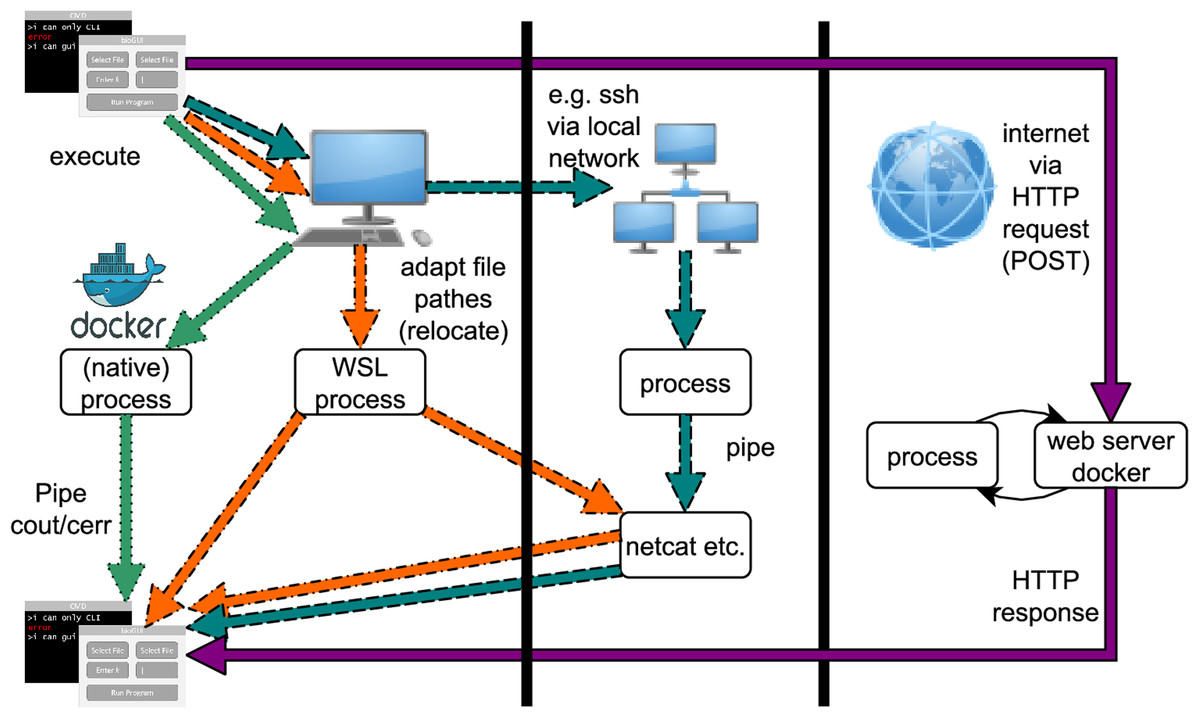
Program execution via bioGUI can be accomplished via different paths, which are shown in Fig. A4. The easiest way is to execute a native program (one that runs natively on the operating system, e.g., Docker). Then all output can be piped to bioGUI to display this to the user. If the host is a Microsoft Windows 10 OS, bioGUI can also run Unix programs via WSL. Then the Unix program runs natively in a WSL bash. The resulting output can be transferred to bioGUI via pipes. Of course, for both native and WSL processes, the output can also be transferred via netcat to bioGUI. The transfer of the GUI template within install modules is an example. If a process runs on a remote computer, the output can be transferred to bioGUI also via network, for example, netcat. Such a process can, for instance, be started by calling ssh from bioGUI with appropriate parameters. Finally bioGUI can also send HTTP POST requests to web services and accepts an HTTP response as answer. This output can also be displayed by bioGUI. | |||
Since the Docker engine is a local, native process, bioGUI also supports the use of Docker containers. The Circlator template is an example of how this can be implemented. | |||
[[File:FigA4 Joppich PeerJ2019 7.jpg|700px]] | |||
{{clear}} | |||
{| | |||
| STYLE="vertical-align:top;"| | |||
{| border="0" cellpadding="5" cellspacing="0" width="700px" | |||
|- | |||
| style="background-color:white; padding-left:10px; padding-right:10px;"| <blockquote>'''Figure A4.''' Possibilities for running bioGUI: locally via processes, on a network via ssh or on the web via HTTP request/response. Straight arrow (purple): HTTP execution mode; Dotted arrow (green): Docker execution; Dotdashed arrow(orange): bash/WSL execution; Dashed arrow(cyan): remote/ssh execution.</blockquote> | |||
|- | |||
|} | |||
|} | |||
===Hardware specification for benchmarks=== | |||
The relevant hardware for benchmarking bioGUI is summarized in Table A1. | |||
{| | |||
| STYLE="vertical-align:top;"| | |||
{| class="wikitable" border="1" cellpadding="5" cellspacing="0" width="100%" | |||
|- | |||
| style="background-color:white; padding-left:10px; padding-right:10px;" colspan="4"|'''Table A1.'''Hardware used to benchmark bioGUI | |||
|- | |||
|- | |||
! style="background-color:#e2e2e2; padding-left:10px; padding-right:10px;"|Computer name | |||
! style="background-color:#e2e2e2; padding-left:10px; padding-right:10px;"|CPU | |||
! style="background-color:#e2e2e2; padding-left:10px; padding-right:10px;"|RAM | |||
! style="background-color:#e2e2e2; padding-left:10px; padding-right:10px;"|Storage | |||
|- | |||
| style="background-color:white; padding-left:10px; padding-right:10px;"|Linux server | |||
| style="background-color:white; padding-left:10px; padding-right:10px;"|Intel Xeon W-2145 CPU @ 3.70 GHz<br />8 cores (+8 HT cores) | |||
| style="background-color:white; padding-left:10px; padding-right:10px;"|128 GB | |||
| style="background-color:white; padding-left:10px; padding-right:10px;"|Samsung SSD 860, 1 TB SSD | |||
|- | |||
| style="background-color:white; padding-left:10px; padding-right:10px;"|Lenovo laptop (T470p) | |||
| style="background-color:white; padding-left:10px; padding-right:10px;"|Intel Core i7-7820HQ @ 2.9 GHz<br />4 cores (+4 HT cores) | |||
| style="background-color:white; padding-left:10px; padding-right:10px;"|32 GB | |||
| style="background-color:white; padding-left:10px; padding-right:10px;"|Samsung MZVLB1T0HALR, 1 TB SSD | |||
|- | |||
| style="background-color:white; padding-left:10px; padding-right:10px;"|Microsoft surface book | |||
| style="background-color:white; padding-left:10px; padding-right:10px;"|Intel Core i5-6300U @ 2.4 GHz<br />2 cores (+2 HT cores) | |||
| style="background-color:white; padding-left:10px; padding-right:10px;"|8 GB | |||
| style="background-color:white; padding-left:10px; padding-right:10px;"|Samsung MZFLV128HCGR, 128 GB SSD | |||
|- | |||
| style="background-color:white; padding-left:10px; padding-right:10px;"|Apple MacBook Air (mid 2012) | |||
| style="background-color:white; padding-left:10px; padding-right:10px;"|Intel Core i5 @ 1.7 GHz | |||
| style="background-color:white; padding-left:10px; padding-right:10px;"|8 GB | |||
| style="background-color:white; padding-left:10px; padding-right:10px;"|128 GB SSD | |||
|- | |||
|} | |||
|} | |||
===Template access=== | |||
[[File:FigA5 Joppich PeerJ2019 7.jpg|1200px]] | |||
{{clear}} | |||
{| | |||
| STYLE="vertical-align:top;"| | |||
{| border="0" cellpadding="5" cellspacing="0" width="1200px" | |||
|- | |||
| style="background-color:white; padding-left:10px; padding-right:10px;"| <blockquote>'''Figure A5.''' ('''A''') On our website a list of already existing templates can be browsed. Besides the description and author, also the type (install module or template) is shown. ('''B''') All uploaded templates can be downloaded directly from within bioGUI. bioGUI allows to search in/filter all available install modules and templates.</blockquote> | |||
|- | |||
|} | |||
|} | |||
===User survey=== | |||
A user survey with 10 participants (four bioinformaticians, and six collaborators consisting of two undergraduate bioinformatics students and four external collaborators) was performed. The derived results are shown in Table A2, and the raw data are shown in Table A3. | |||
{| | |||
| STYLE="vertical-align:top;"| | |||
{| class="wikitable" border="1" cellpadding="5" cellspacing="0" width="100%" | |||
|- | |||
| style="background-color:white; padding-left:10px; padding-right:10px;" colspan="6"|'''Table A2.''' Derived user survey results from the given answers | |||
|- | |||
|- | |||
! style="background-color:#e2e2e2; padding-left:10px; padding-right:10px;"| | |||
! style="background-color:#e2e2e2; padding-left:10px; padding-right:10px;"|''n'' | |||
! style="background-color:#e2e2e2; padding-left:10px; padding-right:10px;"|Median | |||
! style="background-color:#e2e2e2; padding-left:10px; padding-right:10px;"|Mean | |||
! style="background-color:#e2e2e2; padding-left:10px; padding-right:10px;"|''p''-value | |||
! style="background-color:#e2e2e2; padding-left:10px; padding-right:10px;"|Variance | |||
|- | |||
| style="background-color:white; padding-left:10px; padding-right:10px;"|Better interface bio | |||
| style="background-color:white; padding-left:10px; padding-right:10px;"|3 | |||
| style="background-color:white; padding-left:10px; padding-right:10px;"|3 | |||
| style="background-color:white; padding-left:10px; padding-right:10px;"|3 | |||
| style="background-color:white; padding-left:10px; padding-right:10px;"| | |||
| style="background-color:white; padding-left:10px; padding-right:10px;"|4 | |||
|- | |||
| style="background-color:white; padding-left:10px; padding-right:10px;"|Better interface collab | |||
| style="background-color:white; padding-left:10px; padding-right:10px;"|6 | |||
| style="background-color:white; padding-left:10px; padding-right:10px;"|4.5 | |||
| style="background-color:white; padding-left:10px; padding-right:10px;"|4.5 | |||
| style="background-color:white; padding-left:10px; padding-right:10px;"| | |||
| style="background-color:white; padding-left:10px; padding-right:10px;"|0.3 | |||
|- | |||
| style="background-color:white; padding-left:10px; padding-right:10px;"|Better interface all | |||
| style="background-color:white; padding-left:10px; padding-right:10px;"|9 | |||
| style="background-color:white; padding-left:10px; padding-right:10px;"|4 | |||
| style="background-color:white; padding-left:10px; padding-right:10px;"|4.00 | |||
| style="background-color:white; padding-left:10px; padding-right:10px;"| | |||
| style="background-color:white; padding-left:10px; padding-right:10px;"|1.75 | |||
|- | |||
| style="background-color:white; padding-left:10px; padding-right:10px;"|Easy to align CLI | |||
| style="background-color:white; padding-left:10px; padding-right:10px;"|10 | |||
| style="background-color:white; padding-left:10px; padding-right:10px;"|3.5 | |||
| style="background-color:white; padding-left:10px; padding-right:10px;"|3.50 | |||
| style="background-color:white; padding-left:10px; padding-right:10px;"| | |||
| style="background-color:white; padding-left:10px; padding-right:10px;"|1.833 | |||
|- | |||
| style="background-color:white; padding-left:10px; padding-right:10px;"|Easy to align bioGUI | |||
| style="background-color:white; padding-left:10px; padding-right:10px;"|10 | |||
| style="background-color:white; padding-left:10px; padding-right:10px;"|5 | |||
| style="background-color:white; padding-left:10px; padding-right:10px;"|4.90 | |||
| style="background-color:white; padding-left:10px; padding-right:10px;"|0.0098 | |||
| style="background-color:white; padding-left:10px; padding-right:10px;"|0.1 | |||
|- | |||
| style="background-color:white; padding-left:10px; padding-right:10px;"|Easy to install CLI | |||
| style="background-color:white; padding-left:10px; padding-right:10px;"|10 | |||
| style="background-color:white; padding-left:10px; padding-right:10px;"|5 | |||
| style="background-color:white; padding-left:10px; padding-right:10px;"|4.40 | |||
| style="background-color:white; padding-left:10px; padding-right:10px;"| | |||
| style="background-color:white; padding-left:10px; padding-right:10px;"|0.711 | |||
|- | |||
| style="background-color:white; padding-left:10px; padding-right:10px;"|Easy to install bioGUI | |||
| style="background-color:white; padding-left:10px; padding-right:10px;"|10 | |||
| style="background-color:white; padding-left:10px; padding-right:10px;"|5 | |||
| style="background-color:white; padding-left:10px; padding-right:10px;"|4.80 | |||
| style="background-color:white; padding-left:10px; padding-right:10px;"|0.2023 | |||
| style="background-color:white; padding-left:10px; padding-right:10px;"|0.178 | |||
|- | |- | ||
|} | |} | ||
|} | |} | ||
{| | |||
| STYLE="vertical-align:top;"| | |||
{| class="wikitable" border="1" cellpadding="5" cellspacing="0" width="70%" | |||
|- | |||
| style="background-color:white; padding-left:10px; padding-right:10px;" colspan="11"|'''Table A3.''' Relevant participant answers for the performed user survey and the results in Table A2 | |||
|- | |||
|- | |||
! style="background-color:#e2e2e2; padding-left:10px; padding-right:10px;"| | |||
! style="background-color:#e2e2e2; padding-left:10px; padding-right:10px;"|Participant 1 | |||
! style="background-color:#e2e2e2; padding-left:10px; padding-right:10px;"|Participant 2 | |||
! style="background-color:#e2e2e2; padding-left:10px; padding-right:10px;"|Participant 3 | |||
! style="background-color:#e2e2e2; padding-left:10px; padding-right:10px;"|Participant 4 | |||
! style="background-color:#e2e2e2; padding-left:10px; padding-right:10px;"|Participant 5 | |||
! style="background-color:#e2e2e2; padding-left:10px; padding-right:10px;"|Participant 6 | |||
! style="background-color:#e2e2e2; padding-left:10px; padding-right:10px;"|Participant 7 | |||
! style="background-color:#e2e2e2; padding-left:10px; padding-right:10px;"|Participant 8 | |||
! style="background-color:#e2e2e2; padding-left:10px; padding-right:10px;"|Participant 9 | |||
! style="background-color:#e2e2e2; padding-left:10px; padding-right:10px;"|Participant 10 | |||
|- | |||
| style="background-color:white; padding-left:10px; padding-right:10px;"|Usertype (0 = bioinformatician, 1 = student, 2 = collaborator) | |||
| style="background-color:white; padding-left:10px; padding-right:10px;"|0 | |||
| style="background-color:white; padding-left:10px; padding-right:10px;"|0 | |||
| style="background-color:white; padding-left:10px; padding-right:10px;"|0 | |||
| style="background-color:white; padding-left:10px; padding-right:10px;"|0 | |||
| style="background-color:white; padding-left:10px; padding-right:10px;"|1 | |||
| style="background-color:white; padding-left:10px; padding-right:10px;"|2 | |||
| style="background-color:white; padding-left:10px; padding-right:10px;"|2 | |||
| style="background-color:white; padding-left:10px; padding-right:10px;"|1 | |||
| style="background-color:white; padding-left:10px; padding-right:10px;"|2 | |||
| style="background-color:white; padding-left:10px; padding-right:10px;"|2 | |||
|- | |||
| style="background-color:white; padding-left:10px; padding-right:10px;"|Which kind of user-interface does the tool have? | |||
| style="background-color:white; padding-left:10px; padding-right:10px;"|CLI | |||
| style="background-color:white; padding-left:10px; padding-right:10px;"|CLI | |||
| style="background-color:white; padding-left:10px; padding-right:10px;"|CLI | |||
| style="background-color:white; padding-left:10px; padding-right:10px;"|CLI | |||
| style="background-color:white; padding-left:10px; padding-right:10px;"|CLI | |||
| style="background-color:white; padding-left:10px; padding-right:10px;"|CLI | |||
| style="background-color:white; padding-left:10px; padding-right:10px;"|GUI | |||
| style="background-color:white; padding-left:10px; padding-right:10px;"|CLI | |||
| style="background-color:white; padding-left:10px; padding-right:10px;"|CLI | |||
| style="background-color:white; padding-left:10px; padding-right:10px;"|GUI | |||
|- | |||
| style="background-color:white; padding-left:10px; padding-right:10px;"|What were the most cumbersome tasks in accessing and using the software? | |||
| style="background-color:white; padding-left:10px; padding-right:10px;"|Dependencies | |||
| style="background-color:white; padding-left:10px; padding-right:10px;"|Using software, finding settings | |||
| style="background-color:white; padding-left:10px; padding-right:10px;"|Finding settings, options needed | |||
| style="background-color:white; padding-left:10px; padding-right:10px;"|Installing software | |||
| style="background-color:white; padding-left:10px; padding-right:10px;"|Finding settings, options needed | |||
| style="background-color:white; padding-left:10px; padding-right:10px;"|Dependencies, starting the software, using the software | |||
| style="background-color:white; padding-left:10px; padding-right:10px;"|Finding settings, options needed | |||
| style="background-color:white; padding-left:10px; padding-right:10px;"|Finding settings, options needed | |||
| style="background-color:white; padding-left:10px; padding-right:10px;"|Using the software | |||
| style="background-color:white; padding-left:10px; padding-right:10px;"|Finding settings, options needed | |||
|- | |||
| style="background-color:white; padding-left:10px; padding-right:10px;"|CLI: Has the installation process been easy? (0 = NO, 5 = YES) | |||
| style="background-color:white; padding-left:10px; padding-right:10px;"|4 | |||
| style="background-color:white; padding-left:10px; padding-right:10px;"|3 | |||
| style="background-color:white; padding-left:10px; padding-right:10px;"|5 | |||
| style="background-color:white; padding-left:10px; padding-right:10px;"|5 | |||
| style="background-color:white; padding-left:10px; padding-right:10px;"|5 | |||
| style="background-color:white; padding-left:10px; padding-right:10px;"|5 | |||
| style="background-color:white; padding-left:10px; padding-right:10px;"|4 | |||
| style="background-color:white; padding-left:10px; padding-right:10px;"|5 | |||
| style="background-color:white; padding-left:10px; padding-right:10px;"|5 | |||
| style="background-color:white; padding-left:10px; padding-right:10px;"|3 | |||
|- | |||
| style="background-color:white; padding-left:10px; padding-right:10px;"|CLI: Has it been easy to align the reads? (0 = NO, 5 = YES) | |||
| style="background-color:white; padding-left:10px; padding-right:10px;"|4 | |||
| style="background-color:white; padding-left:10px; padding-right:10px;"|2 | |||
| style="background-color:white; padding-left:10px; padding-right:10px;"|5 | |||
| style="background-color:white; padding-left:10px; padding-right:10px;"|5 | |||
| style="background-color:white; padding-left:10px; padding-right:10px;"|4 | |||
| style="background-color:white; padding-left:10px; padding-right:10px;"|3 | |||
| style="background-color:white; padding-left:10px; padding-right:10px;"|3 | |||
| style="background-color:white; padding-left:10px; padding-right:10px;"|5 | |||
| style="background-color:white; padding-left:10px; padding-right:10px;"|3 | |||
| style="background-color:white; padding-left:10px; padding-right:10px;"|1 | |||
|- | |||
| style="background-color:white; padding-left:10px; padding-right:10px;"|bioGUI: Has the installation process been easy? (0 = NO, 5 = YES) | |||
| style="background-color:white; padding-left:10px; padding-right:10px;"|5 | |||
| style="background-color:white; padding-left:10px; padding-right:10px;"|5 | |||
| style="background-color:white; padding-left:10px; padding-right:10px;"|5 | |||
| style="background-color:white; padding-left:10px; padding-right:10px;"|4 | |||
| style="background-color:white; padding-left:10px; padding-right:10px;"|5 | |||
| style="background-color:white; padding-left:10px; padding-right:10px;"|5 | |||
| style="background-color:white; padding-left:10px; padding-right:10px;"|5 | |||
| style="background-color:white; padding-left:10px; padding-right:10px;"|5 | |||
| style="background-color:white; padding-left:10px; padding-right:10px;"|5 | |||
| style="background-color:white; padding-left:10px; padding-right:10px;"|4 | |||
|- | |||
| style="background-color:white; padding-left:10px; padding-right:10px;"|bioGUI: Has it been easy to align the reads? (0 = NO, 5 = YES) | |||
| style="background-color:white; padding-left:10px; padding-right:10px;"|5 | |||
| style="background-color:white; padding-left:10px; padding-right:10px;"|5 | |||
| style="background-color:white; padding-left:10px; padding-right:10px;"|5 | |||
| style="background-color:white; padding-left:10px; padding-right:10px;"|5 | |||
| style="background-color:white; padding-left:10px; padding-right:10px;"|5 | |||
| style="background-color:white; padding-left:10px; padding-right:10px;"|5 | |||
| style="background-color:white; padding-left:10px; padding-right:10px;"|5 | |||
| style="background-color:white; padding-left:10px; padding-right:10px;"|5 | |||
| style="background-color:white; padding-left:10px; padding-right:10px;"|5 | |||
| style="background-color:white; padding-left:10px; padding-right:10px;"|4 | |||
|- | |||
| style="background-color:white; padding-left:10px; padding-right:10px;"|Overall: Which interface was easier to use in your opinion? (0 = CLI, 5 = GUI) | |||
| style="background-color:white; padding-left:10px; padding-right:10px;"|5 | |||
| style="background-color:white; padding-left:10px; padding-right:10px;"|1 | |||
| style="background-color:white; padding-left:10px; padding-right:10px;"|3 | |||
| style="background-color:white; padding-left:10px; padding-right:10px;"|4 | |||
| style="background-color:white; padding-left:10px; padding-right:10px;"|5 | |||
| style="background-color:white; padding-left:10px; padding-right:10px;"|5 | |||
| style="background-color:white; padding-left:10px; padding-right:10px;"|4 | |||
| style="background-color:white; padding-left:10px; padding-right:10px;"|4 | |||
| style="background-color:white; padding-left:10px; padding-right:10px;"|5 | |||
| style="background-color:white; padding-left:10px; padding-right:10px;"| | |||
|- | |||
|} | |||
|} | |||
[[File:FigA6 Joppich PeerJ2019 7.jpg|700px]] | |||
{{clear}} | |||
{| | |||
| STYLE="vertical-align:top;"| | |||
{| border="0" cellpadding="5" cellspacing="0" width="700px" | |||
|- | |||
| style="background-color:white; padding-left:10px; padding-right:10px;"| <blockquote>'''Figure A6.''' Scores given by the 10 participants on the question “Has it been easy to align the reads?” after performing the task using the CLI and bioGUI. These results show that most participants found the task easier using bioGUI, but for no-one it was harder to use bioGUI.</blockquote> | |||
|- | |||
|} | |||
|} | |||
==Supplemental information== | ==Supplemental information== | ||
Latest revision as of 00:53, 7 January 2020
| Full article title | From command-line bioinformatics to bioGUI |
|---|---|
| Journal | PeerJ |
| Author(s) | Joppich, Markus; Zimmer, Ralf |
| Author affiliation(s) | Ludwig-Maximilians-Universität München |
| Primary contact | Email: joppich at bio dot ifi dot lmu dot de |
| Editors | Gillespie, Joseph |
| Year published | 2019 |
| Volume and issue | 7 |
| Page(s) | e8111 |
| DOI | 10.7717/peerj.8111 |
| ISSN | 2167-8359 |
| Distribution license | Creative Commons Attribution 4.0 International |
| Website | https://peerj.com/articles/8111/ |
| Download | https://peerj.com/articles/8111.pdf (PDF) |
Abstract
Bioinformatics is a highly interdisciplinary field providing informatics applications for scientists from many disciplines. Installing and starting applications on the command line (CL) is inconvenient and inefficient for many scientists. Nonetheless, most methods are implemented with a command-line interface only. Providing a graphical user interface (GUI) for bioinformatics applications is one step toward routinely making CL-only applications more readily available to scientists, yielding a positive step toward more effective interdisciplinary work. With our bioGUI framework, we address two main problems of using CL bioinformatics applications. First, many tools work on UNIX-based systems only, while many scientists use Microsoft Windows. Second, scientists refrain from using CL tools, which, despite their reservations, could well support them in their research. With bioGUI install modules and templates, installing and using CL tools is made possible for most scientists, even on Windows, due to bioGUI’s support for Windows Subsystem for Linux. In addition, bioGUI templates can easily be created, making the bioGUI framework highly rewarding for developers. From the bioGUI repository it is possible to download, install, and use bioinformatics tools with just a few clicks.
Introduction
Many advances in bioinformatics rely on sophisticated applications. Examples include Trinity[1] for de novo assembly in conjunction with Trimmomatic[2], or the HISAT2, StringTie, and Ballgown pipeline for transcript-level expression analysis.[3] These tools have in common that when locally installed, only a command-line interface (CLI) is provided, implying a burden for many conducting sequence analysis and alignments who are not computing-adept.[4] Jellyfish[5], Glimmer[6], and HMMER natively run only in UNIX-environments and require a sophisticated setup on Windows. In addition, the installation of command-line (CL) tools is a challenge for non-computer specialists, for example, due to package dependency resolution. This problem has been addressed by the AlgoRun package[7], providing a Docker-based repository of tools. Being a web-based service, it limits use to web-applicable data sizes, or local data must be made available to the Docker container in the cloud. While AlgoRun has the advantage of processing data anywhere, it relies on Docker. Docker may be run either on a local workstation or in the cloud. On a local workstation it can induce incompatibilities with existing software (using Hyper-V on Windows). A cloud-based service may conflict with data privacy guidelines[8], for example, with respect to a possible de-anonymization of patient samples.[9] Using Windows Subsystem for Linux (WSL) is often possible in such a scenario: it is provided as an app from the Microsoft Store.
A frequent argument for not providing a graphical user interface (GUI) is the overhead for developing it and the effort to make it truly “user centered.” Often GUIs are simply deemed unnecessary by application developers. However, one can be skeptical whether scientists who are not computing-adept can efficiently use CLIs in their research. In fact, bioinformatician Dr. István Albert[10] notes that “Bioinformatics, unfortunately, has quite the number of methods that represent the disconnect of the Ivory Tower.” Pavelin et al.[11] note that software is often developed without a focus on usability of interfaces (for end-users). While this does not imply that any GUI is helpful, we argue that without a GUI, the otherwise highly sophisticated CL applications are not very useful for some scientists. Besides, a GUI is often more convenient and helps to avoid using the wrong parameters, especially if an application is not yet routinely used in a lab. University of Western Ontario's David Roy Smith[12] also states that GUI-driven applications make daily work in biology or medical labs easier. Smith remarks that many end-users have a “penchant for point and click,” not being able to effectively use CL tools. Still, they should have the ability to access and analyse their own data. Many proprietary software solutions address this demand: they allow GUI-based data management, while also being extensible via plug-ins. Smith[13] also points out that one of the biggest advantages of such plugins is to combine the power of peer-reviewed algorithms with a user-friendly GUI. Thus, providing a GUI is an important step toward the applicability of methods by end-users.
Visne et al.[14] present a universal GUI for R aiming to close the gap between R developers and GUI-dependent users with limited R scripting skills. Additionally, web-based workflow systems, like Galaxy[15] or Yabi[16] provide a means to easily execute bioinformatics applications, but they tend to focus on more complex workflows. However, both Galaxy and Yabi are designed to be run and maintained by bioinformaticians for several users and are not meant to run on a single, individual basis, like in small labs. More recently Morais et al.[4] stated that the accessibility of bioinformatics applications is one of the main challenges of contemporary biology, and that one of the main problems for users is the struggle of using CLIs. While a GUI does not make an application user-friendly per se, it helps to make it more accessible by lowering the burden to use it.[14][4][17][18][19]
In recent Microsoft Windows operating systems the WSL feature can be activated. This feature provides a native, non-virtualized Ubuntu environment on Windows, allowing to run most applications that also run on Ubuntu. This solves the problems of running Unix-based tools on Windows. Remaining problems for scientists aiming to run bioinformatics applications thus might be the installation and usage of CL applications.
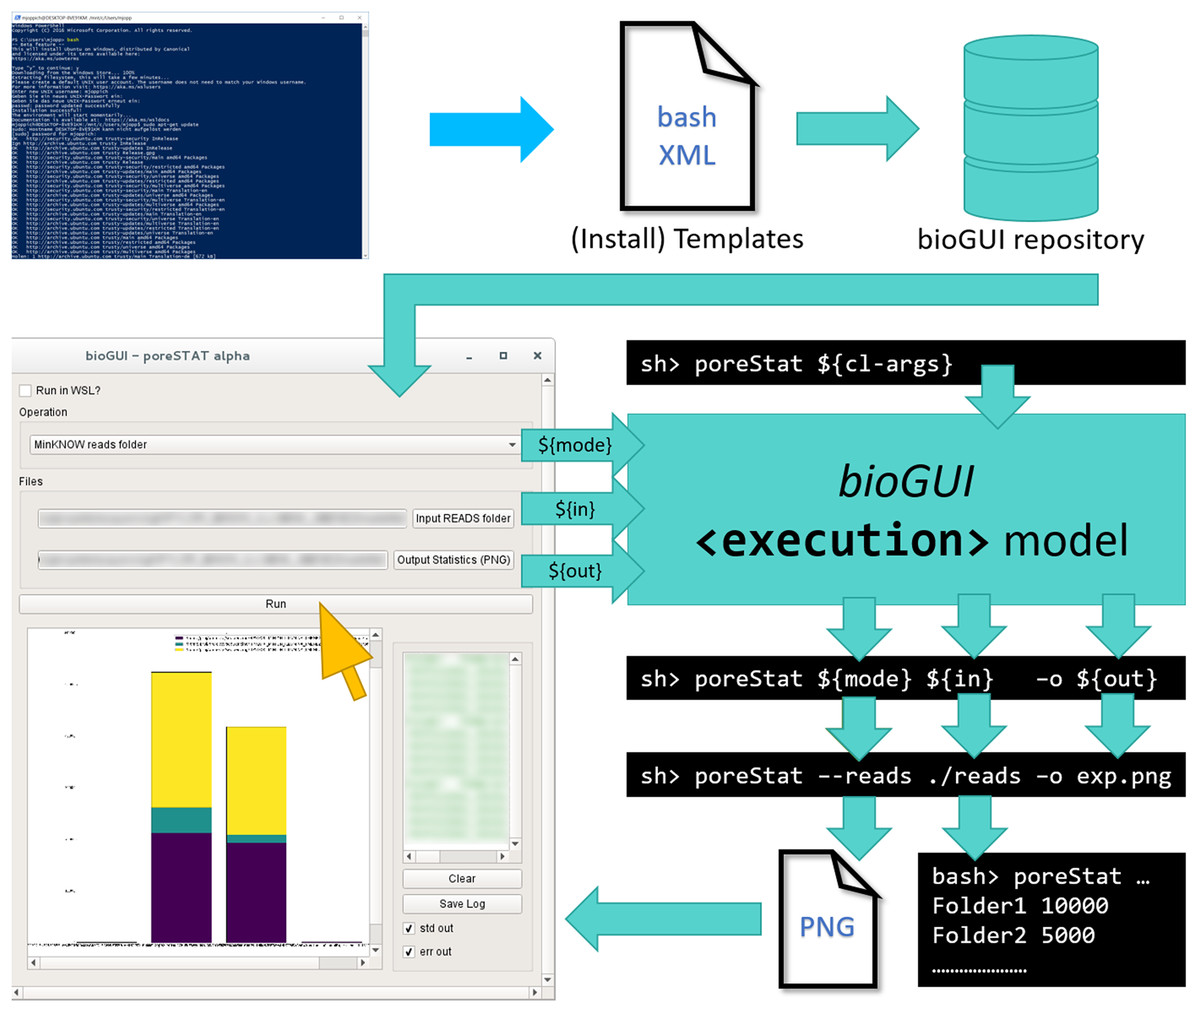
Here we present bioGUI, an open-source cross-platform framework for making CL applications more accessible via a GUI. It uses an XML-based domain-specific language (DSL) for template definition, which lowers the initial effort to create a GUI. bioGUI templates for CL applications can easily be scripted. Combined with install modules, the templates provide an efficient and convenient method to deploy bioinformatics applications on Microsoft Windows (via WSL), Mac OS, and Linux. bioGUI also addresses protocol/parameter management by saving completed templates, enabling easy reproducibility of data analyses (Fig. 1).
|
Methods
This section first summarizes existing GUI-based systems, then it covers the use-case study we performed and goes into detail of how bioGUI works.
Existing workflow systems
There are several workflow systems already available. Most prominent in bioinformatics are the Galaxy server and Yabi. In addition, workflow specification languages such as the Common Workflow Language (CWL) or Nextflow exist. These workflows do not directly compare to bioGUI because they (usually) require a server infrastructure and are not aimed to run on a local computer. However, they have in common that no CLI is needed to run bioinformatics applications.
With the R Gui Generator (RGG) a general GUI framework for R already exists. Recently, specialized GUI frameworks like SEED 2[19] or RNA CoMPASS[17] have been presented.
Galaxy and Yabi
The Galaxy server[15] is a well known workflow system in bioinformatics. While bioGUI does not aim to be a workflow system like Galaxy—for example, allowing data management—there are similarities. For instance, Galaxy also provides a web-based GUI for its workflows. However, all data to be processed by Galaxy must either be on the server itself or uploaded to a location that is reachable by the server. Galaxy can access cloud storage, but classified data may not be uploaded to such storage, as pointed out in the introduction. Additionally, Galaxy requires Unix knowledge to be installed and does not provide a binary for installation. Galaxy is not cross-platform compatible. (Microsoft Windows is supported through WSL but still requires Unix knowledge.) Galaxy users provide Docker containers for Galaxy, where a local storage can be mounted.
Another framework providing similar options is Yabi (Hunter et al., 2012). Yabi is only distributed using a Docker container.
Nextflow and DolphinNext
The combination of Nextflow and DolphinNext provides similar functionality to Galaxy or Yabi. While Nextflow is a DSL for describing general workflows (lacking a GUI definition), DolphinNext provides the web-based user interface (UI) which enables a convenient usage of Nextflow workflows. Nextflow requires a POSIX system architecture and may or may not run on Microsoft Windows using Cygwin. DolphinNext resembles a lot the Galaxy framework, which can make use of CWL workflows; however, it focuses on a deployment in a cluster environment. It is unknown whether or not both systems work on WSL.
Common Workflow Language
The CWL[20] is a new standard for workflow definition and defines a DSL. In this language, inputs, input-types, and the corresponding parameters are stored. Additionally, inputs can have a help text included.
Using the bio.tools ToolDog software[21], CWL workflows can be generated and exported for many bioinformatics applications. An advantage of using bio.tools is the automatic annotation and description of input and outputs. Unfortunately, for many packages no CWL workflows have been deposited.
SEED 2 and bioinformatics through windows
In contrast to the previously mentioned tools, SEED 2[19] and Bioinformatics through windows (BTW)[4] do not focus on running complex workflows in a cluster environment. Instead, these focus on specific tasks which can be run on regular laptop computers. SEED 2 focuses on amplicon high-throughput sequencing data analyses. On the other hand, BTW follows the same concept but focuses on the analysis of marker gene data and does not provide a GUI for this task. SEED 2 provides a GUI to perform the relevant analyses fast and conveniently, while BTW focuses on the usability of Unix CL tools on Windows.
RGG and AutoIt
RGG was developed as a general GUI framework for R applications.[14] It uses XML files to specify the input fields for the graphical representation. When the user has set all options, the GUI is translated into an R script for execution. The execution output can also be retrieved from the RGGRunner application. The RGG software is limited to R scripts, but the authors have expressed their hope that providing GUI for analytical pipelines could “help to bridge the gap between the R developer community and GUI-dependent users.”[14]
In contrast to RGG, AutoIt is a general automation framework which, similar to bioGUI, allows the definition of a GUI as well as a task that is executed according to this input. In contrast to AutoIt, bioGUI is cross-platform compatible, supports WSL, and provides install modules for bioinformatics applications.
Comparison of existing workflow systems to bioGUI
bioGUI is not a classical workflow system like Galaxy, CWL, or DolphinNext, when paired with Nextflow. bioGUI is not meant to run many tasks nor to run in a cluster environment. Moreover, bioGUI does not share the philosophy of having a compute cluster set up to run analyses in a repeated fashion. bioGUI is meant to enable the user to perform bioinformatics analysis at their work place. With bioGUI we aim to provide low-effort usage of bioinformatics applications, without the need to set up a complicated environment. This allows users to easily compare different methods on collected experimental data.
bioGUI finds its niche as a generalization of the concepts introduced by Větrovský, Baldrian, and Morais[19] and Morais et al.[4] SEED 2 provides a GUI such that a broad public has access to sophisticated and well-known bioinformatics CL applications in the context of amplicon analysis. Similar concepts, yet differently implemented, are provided by RNA CoMPASS[17] for pathogen-host transcriptome analysis or PipeCraft.[18] Here, custom web-based UIs let the user interact with their specialized pipelines. RGG[14] offers a general GUI framework for R applications only. bioGUI offers a similar framework, which is applicable to any Unix application. In both, RGG and bioGUI, users/developers specify the visual elements in an XML file. This XML file is then interpreted and translated into a GUI within an application (RGGRunner or bioGUI, respectively), which also shows the output of the script.
The bioGUI framework extends the concepts presented by RGG and SEED 2, for instance, to general applications, and improves accessibility to these applications by providing install modules.
Use case study
One of the main goals we had in mind when developing bioGUI was to create a powerful framework, which is easy-to-use for several types of users and that does not create significant overhead for the application developer. In order to study this, we introduce two classes of possible users. The first class represents a general user of the software who generally prefers a GUI for performing a research task, for example, data analysis after sequencing. The second class describes a software developer releasing an application of a new algorithm to solve the alignment of sequencing reads. This class thus depicts a typical developer.
From these two use cases (see also the Appendix section “Use cases”) we identify the requirements or goals for bioGUI:
- Installing new programs must be simple and should not require system administrators.
- Creating a GUI for a program must not take a lot of time.
- Templates must bring a basic GUI to run the programs, and output must not be interpreted.
- Templates must be saveable for later re-use and reference, and also be searchable.
- The system must be lightweight (runtime overhead, disk-space) to allow for running applications on laptops.
- Installing a program may require additional (protected) external files.
Finally, we developed a paper mock-up, with which we went through the anticipated workflow of the user. We identified several input components and features the bioGUI program has to include (Fig. A1, in the Appendix).
bioGUI approach
“The accessibility of bioinformatics applications is crucial and a challenge of contemporary biology.”[4] Particularly, the usage of CLIs poses a problem. Since most bioinformatics applications require the execution of commands on the CL for installation (such as for compilation, adding dependencies to the path variable, etc.), we estimate installation also poses a problem.
During the use-case study, and interviews with wet-lab scientists without a computational background (Q. Emslander, 2019, personal communication; L. Jimenez, 2019, personal communication), we found two main problems with bioinformatics applications for scientists, which we want to address with bioGUI: the installation of potentially useful applications and the application's usage. Both problems have in common that they are expected to be performed on the CL. A GUI for achieving the respective tasks in bioinformatics (and beyond) is missing.
In particular, the first task of installing bioinformatics applications on a user’s machine poses a few problems. Most bioinformatics applications are written for a Unix operating system, like Linux or Mac OS, while in general Microsoft Windows is the dominant operating system. In order to overcome this problem, bioGUI makes use of WSL on Windows. Even if the user’s OS is already Unix-like, using the CL to install software might prove cumbersome. Thus, in order to support all users, bioGUI uses a cross-platform approach. bioGUI is developed in C++ using the Qt framework.
The general workflow for any program using bioGUI is shown in Fig. 1 (above). Given a CL application, the software developer (blue) writes the specific template in an XML-based DSL and can then make this template available, for example, in the bioGUI repository (cyan). Such templates can be automatically retrieved by bioGUI. Upon selection of a template by the user, bioGUI displays the input mask as defined in the template. When the user (yellow) has filled in all parameters, the parameters are collected by bioGUI and assembled into CL arguments, which are used to execute the original CL-only application. Upon completion, simple results (like text-output or images) can be shown in bioGUI directly or within an external application that is opened.
Install modules
Install modules are designed to install applications such that bioGUI can access them. Essentially, install modules are bash scripts which allow an automatic installation of applications into a predefined location. For this purpose, install modules receive several arguments from bioGUI when launched, for example, where to install the application to, the sudo password to fetch packages via a system’s package manager (e.g., aptitude, conda), whether the application should be made available to the user via the system’s PATH variable, etc. Install modules download and install applications and make them available to the user and bioGUI. However, some applications cannot be simply downloaded, but are distributed by installers. For this purpose, the install module template can be extended by further input fields. These must be specified by bioGUI elements, and their values are added to the end of the CL arguments of the install module. An install module can then execute the referenced installer.
Finally, an install module should contain the specification of its bioGUI template and could hardcode the path to the installed application. Other constant values, which can already be derived during the installation (e.g., absolute paths to dependencies), could also be defined in the template during this stage.
bioGUI templates
bioGUI templates are the actual end-user-interface to programs. A bioGUI template defines the look and functions of the UI. Thus it can define how the CL-application is called (with corresponding parameters).
Each bioGUI template consists of two parts (Fig. A2). The first part (the <window> model) defines the visual appearance of the GUI. The second part (the <execution> model) defines the processing logic of the template. Input values from the GUI components are collected and assembled (e.g., pre-/post-processing steps) to call CL applications. As part of this assembly, input values from the GUI may be transformed using multiple predefined nodes. Concatenations are possible using the <add> node, and constant values can be inserted using the <const> node. System environment properties, such as the operating system, the computer’s IP address, or specific directories can be collected using the <env> node. If the regular nodes are not sufficient, for example, because more complex string manipulations should be made (see use-case study), script nodes may also accept functions written in LUA or JavaScript.
In general, the execution part infers a network with inputs (e.g., GUI elements, other nodes within the execution part) and actions (if, add). For example, the execution network for an application with many sub-commands is exemplarily shown in Fig. A3 (see Appendix).
The time to template varies with the application as well as the number of options to be included. A simple template, like the one for MS-EmpiRe[22], can be created within 10 minutes. More comprehensive templates, like the one for HISAT2, usually take about 30 minutes. Time can be saved if only the most important command line options are shown in the GUI. This can be achieved by adding an “optional parameters” input field, where users can insert CL arguments themselves. This is, for instance, shown in the wtdbg2[23] and spades[24] templates. Adding the install part to a template usually can be done within 15 to 30 minutes, depending on how detailed the build process is documented. The creation of an install module thus takes approximately one hour.
bioGUI integration with CWL and argparse
The CWL[20] only describes the CL workflow and neither provides a GUI nor a means to install the desired tool. Due to this more general specification, CWL fits most problems, but specific annotations of inputs, explanations, or the embedding of images is not supported in CWL.
While developers can always create templates manually, bioGUI supports developers by offering a template generator from CWL templates or python3 argparse CL parsers. Since there are already many CWL templates available for bioinformatics CL applications, CWL files can be used as a base to automatically generate bioGUI templates from. Using the bioGUI template generator for argparse, it is also possible to automatically generate templates from CWL files (making use of the cwl2argparse program provided by CWL). Our generator takes as input the argparse parser or CWL file and creates input elements for all elements. In case the type of an input is unclear or not supported, the generator falls back to a regular text-input element.
Results
bioGUI templates
Currently more than 25 install modules exist for bioGUI. These represent basically three groups of bioinformatics tasks: next-generation sequencing data analysis and transcriptomics, long read sequencing analysis and assembly, and a more general sequence analysis. In general, these install modules will install the respective application on the local machine. The Circlator[25] template allows to pull and use the corresponding Docker image. The available tools, as well as their respective categorization, are listed in Table 1.
| ||||||||||||||||||||||||||||||||||||||||||||||||||||||||||||||||||||||||||||||||||||||||||||||||||||||||||||||||||||||||||
Benchmarking bioGUI templates
Our benchmark comprises of four tasks. The first task is to assemble a bacterial genome from Oxford Nanopore long reads, for which the minimap2[39]/miniasm[40]/racon[41] pipeline (available as install module from bioGUI) is used. The second task is the quantification of reads from a yeast mRNA sequencing project using Oxford Nanpore Reads and Illumina Reads (EMBL ENA studies PRJNA398797 [MinION] and SAMN00849440 [Illumina]). The quantification is performed using featureCounts from the subread package.[30] The third task uses these results to compute differential gene expression. Differential gene expression analysis is performed using MS-EmpiRe in R (install module available[22]). Finally the fourth task uses RNAhybrid[36] to predict miRNA binding sites (1,978 murine miRNAs) in 170 sequences of each 200 nt.
The results are shown in Table 2. The given run times are wall clock times. The peak RAM consumption has been sampled from the process viewer on the given operating systems (Task Manager on Windows, top on Linux and Mac OS).
| ||||||||||||||||||||||||||||||||||||||||||||||||||||||||||||||||||||||||||||||||
Discussion
bioGUI is a framework for easy GUI-based usage of CL applications in the life sciences. Using bioGUI, high-quality CL applications can be made accessible to as many researchers as possible. This is achieved by lowering the hurdles to overcome for using bioinformatics applications, particularly on Windows.
Use-case analysis
Our use-case analysis (Appendix section “Use cases”) has revealed several requirements for bioGUI (see the section “Methods”) to enable the user to perform the sequencing analysis and to allow the developer to rapidly create a template (Fig. 2).
|
An easy installation (goal 1) is given through the availability of install modules, which can be downloaded from the bioGUI repository and started via the GUI. These also allow additional inputs (e.g., Python wheels for albacore, goal 6).
The install modules combine the installation of an application and the creation of the actual GUI template. If the developers employ automatic testing of their software (e.g., build checks with Travis), the install part resembles a Travis container setup (goal 2): dependencies and the application itself are installed into an operating system. Even if not, most bioinformaticians extensively use Ubuntu and/or bash scripts. Thus writing a script to install dependencies is not a significantly hard workload. We have reached a seamless and time-efficient creation of templates using an XML-based DSL. XML is particularly helpful as it allows to specify hierarchies and attributes to objects. Using our template generator for CWL and python3-argparse, bioGUI templates can be created even faster (goal 2). The templates are highly flexible in the creation of CL parameters, also due to providing script nodes. By providing install modules and templates, high-quality open-source bioinformatics applications become more accessible to the community.
The bioGUI application is cross-platform compatible and only requires a few megabytes of disk space (goal 5). bioGUI implements several possibilities to execute applications (see Fig. A4, in the Appendix). In general, the only runtime overhead involved is the creation of a bash process, which starts the actual program with the assembled CL arguments (goal 5). bioGUI, being a local stand-alone application, has the possibility to target both locally installed and web-based applications, reachable within a controlled environment and with large data. In addition, bioGUI also supports the use of Docker containers, for cases where all other options fail.
The UI can be made easily understandable (goal 3). Using text labels, the user can get help on inputs (if specified by the developer), links can be used to provide further information, and, most importantly, tooltips could also hint the user to which information is needed at a certain step.
Finally, completed templates can be saved via the "Save Template" button in bioGUI, and all available templates can be filtered (goal 4). This enables a user to keep track of performed analyses, and it makes results more reproducible because parameters are saved. Having the possibility to save templates also allows users to easily repeat an analysis with the same parameters. Additionally, using the bioGUI repository, templates can easily be shared among users, making it easier to standardize runs among different users or even institutes.
An anonymous survey (with 10 participants) about common problems in using bioinformatics software was also conducted among colleagues (n = 4) and undergraduate students or collaborators from the life sciences (n = 6, short: collaborators). The results are available in the Appendix section.
We asked “What were the most cumbersome tasks in accessing and using the software?”, referring to recently used bioinformatics software by the participants. Eight of the 10 participants answered that finding parameters or using the software was cumbersome. This shows that the selected goals for bioGUI address actual problems faced by both experts and regular users. We further asked the participants to install and use graphmap[31], which was selected because it is reasonably easy to install and use. First the participants were asked to install the tool using the CLI as well as via bioGUI. For this task, all instructions have been provided. The question “Has the installation process been easy?” (0 = No, 5 = Yes) has been answered with an average score of 4.4 for the CLI and 4.8 for bioGUI. Then the participants were asked to align the given reads against a given reference genome, without giving the instructions. Again we asked “Has it been easy to align the reads?” (0 = No, 5 = Yes). Here the CLI scored a 3.5 on average and bioGUI a 4.9. (Fig. A6). This coincidences with the answer to our question “Overall: Which interface was easier to use in your opinion?” (0 = CLI, 5 = GUI). Here the average score was 4. Bioinformaticians and collaborators answered differently: the average bioinformatician was undecided on which interface was easier to use (average 3), but non-bioinformaticians preferred the GUI over the CLI (average 4.5).
The survey indicates that there are problems with bioinformatics software regarding installation and usage of CLI tools. These problems can be reduced by providing a GUI for these programs. The more experienced a user is on the CL, the less impact a GUI has. But particularly for non-experts on the CL, a GUI makes it easier to use a program.
bioGUI repository
We provide a repository of preconfigured templates on our website (see Fig. A5, in the Appendix), where authors and users can search for and browse existing templates or submit new ones. bioGUI can access uploaded templates and save them directly for use. Install modules are provided specifically for WSL and Ubuntu users, which manages dependency resolution and installs applications (locally) onto the user’s device. This currently works in any environment using the aptitude (apt) package manager, but users can submit templates which also support other environments, since install modules are versatile bash scripts. On Mac OS, some install modules support Homebrew for template installation. Install modules download and may severely alter a system (especially if the sudo password is supplied). Thus, submitted install modules are manually curated and are only accessible when no security threat has been identified.
The major goal of bioGUI is to enable any scientist to use bioinformatics applications. While we extend the repository on a regular basis depending on our own use, users can also request new templates for applications relevant to them.
Availability and extensibility
bioGUI is open-source software, and users or institutions can either use our global bioGUI repository or deploy a custom repository, for example, one which is only reachable within an institution.
bioGUI is available on GitHub. Both source code as well as pre-built binary distributions (for Microsoft Windows, Linux, and Mac OS) are available. While bioGUI will run on any Linux distribution, install modules currently use mainly aptitude as a package manager (e.g., Ubuntu, debian-based distributions). If used on Windows, the same applies for the used WSL-application (Ubuntu 18.04 is recommended). bioGUI has been tested on Microsoft Windows 10, build 17763. On Mac OS, bioGUI uses Homebrew to install dependencies. Homebrew does not support a silent, non-interactive installation: the user has to install Homebrew before running the "First time setup for Mac OS" install module, which will then install the most common dependencies.
While a number of use cases and corresponding components are already included in bioGUI, we encourage users to contribute on GitHub by either pushing their own extensions or opening feature requests. Further documentation (installation and setup guide, how to write templates) is also available via ReadTheDocs.
Benchmarking bioGUI templates
bioGUI starts a subprocess for each executed program. Thus, the only overhead created by bioGUI itself is the one for running the GUI, which creates less than 1% CPU usage, allocates less than 50 MB, and only performs IO operations when loading a new template (assessed via Sysinternals Process Explorer [Microsoft Sysinternals, 2019]).
Nonetheless, we have been interested in demonstrating that many bioinformatics tasks do not require a dedicated server setup but can be performed on regular laptop computers. We thus benchmarked four typical tasks performed using bioGUI.
The selected tasks allow a good overview of different demands: Tasks 1 (assembly) and 3 (differential expression analysis) are CPU-bound tasks, while tasks 2 (feature counting) and 4 (miRNA target prediction) are IO-bound. Particularly, Task 2 has a high load of read operations, and Task 4 has a high demand of write operations. We compare these tasks on a dedicated Linux server, one rather powerful Lenovo T470p laptop computer, one Surface Book laptop computer (resource-wise a typical laboratory laptop), and one MacBook Air. The computer specifications are listed in the Table A1 (see Appendix) and results are shown in Table 2 (above). Even though we have not included the alignment of the Illumina yeast reads in this benchmark, it should be noted that this task also runs well on laptop computers. On the Lenovo laptop, the alignment of the SRR453566 sample, consisting of 5,725,730 paired reads, has a peak RAM consumption of 34 MB and took 13:50 minutes, while the Surface Book is even faster at less than eight minutes. This presumably can be explained due to different SSD speeds.
The results in Table 2 (above) show that even computationally low-end computers can run bioinformatics tools. More interestingly, these results show that the WSL allows the execution of interesting bioinformatic tools. It can be seen that WSL is slow for IO operations, but it has a comparable speed for in-memory operations. Particularly, tools requiring a lot of IO are considerably faster on the Linux Server (Assembly, RNAhybrid), while the computationally expensive tools like MS-EmpiRe[22] and featureCounts[30] run within similar times.
Conclusion
The bioGUI framework makes it easy to develop, provide, and use GUIs for CL applications. Particularly for non-computer experts, using CLIs is cumbersome. Providing a GUI and/or install modules increases accessibility to high-quality bioinformatics applications for these users. bioGUI creates a cross-platform GUI experience for many open-source bioinformatics applications. In particular, bioGUI enables the deployment of academic bioinformatics applications to Microsoft Windows workstations and laptops, as well as Linux or Mac OS.
The separation of the GUI components and the program logic allows for the creation of templates in two steps. First, the template developer adds input elements to the window and, second, assembles these inputs according to the needs of the application back into CL arguments. This way almost any CL application can be used with a GUI, enabling many more researchers to use open-source tools. Providing install modules to make Unix applications available to Microsoft Windows users (via WSL) supports this goal.
bioGUI can not always replace dedicated GUIs. A tailored UI will still be more usable and user-friendly than any generic solution can be. We experienced this in our use case: certain tasks (e.g., selecting options) require special solutions, let alone from displaying or interpreting the results. However, especially with the install module concept, we aim to provide a seamless installation and create the possibility to run CL applications by all scientists. Using the bioGUI framework, simple GUIs can be constructed. But these simple GUIs already help to make bioinformatic tools more accessible by making execution and usage of these tools more comfortable.
Using bioGUI, it becomes a simple exercise to use supported CL applications from a GUI. Currently, there are already installed modules and templates for more than 25 applications in our bioGUI repository. bioGUI lowers the burden to use excellent applications, allowing more scientists a better analysis of their data. With bioGUI, it is not necessary to understand how to use and navigate on the CL; instead, the focus is set on the applications, its method and parameters, and finally the data.
Appendix
Use cases
Non-computer expert
Many researchers work in small labs without any significant IT support. The computers in their labs mostly run Microsoft Windows, and PhD students often have to bring their own devices (because the institute does not provide such working devices). Particularly in the life sciences, users can profit greatly from existing open-source software. However, installing major bioinformatics applications on such lab computers often poses a problem: administrators (if existent) have little time to deploy new applications, or there is no support in installing new applications at all. If the users are not computer experts, installing and using command line (CL) tools may be cumbersome for them (see the user surveys in this appendix). While there are users that can use the CL efficiently, the cited literature and our personal experience shows that there are many users who do not feel comfortable on the CL. This does not mean that they don’t want to learn it or are incapable of learning it, but their focus simply does not lie in learning to use the CL. Instead, they want to get the results for their data fast, reliably, and without issue. One of these users is Luisa.
Oxford Nanopore Sequencing is becoming more and more popular, and even the sequencing hardware can be found in more and more biological laboratories, like in Luisa’s. Particularly important for MinION sequencing is the post-processing of the actual raw read data. While in previous versions base-calling was directly performed in the cloud by Oxford Nanopore, this has now been pushed back to the client side. Thus, despite having the sequencing data on her laptop, Luisa must still retrieve the sequences herself, using, for instance, the Albacore basecaller (if they don’t want to rely on LiveBasecalling). Unfortunately, like many bioinformatics packages, the basecaller only comes as a python CL program. Additionally, the download is only available as a Python wheel, which means there is no UI-based setup available. Luisa thus needs assistance for the installation of the Python wheel, as well as starting the basecalling process. After the reads are basecalled, reads need to be aligned to a reference genome. While reference genomes in a correct format exist on her lab computer (or can easily be downloaded from the web), the CL program to map the reads is available only from GitHub to be installed from source. Luisa has trouble using the CL to clone the repository, compile, and use the CL application.
Luisa does not require a custom analysis of her data but rather wants to initially screen her data in a simple, basic, and robust analysis. She is mostly busy in her lab, hence an analysis has to be prepared fast, and parameters should be stored for later reference. For this, a local searchable database of saved templates is needed.
Software developers
A developer finished his sequence alignment program. The project is already published on GitHub and in a journal, but only a few people start using it. From the issues and feature requests on GitHub it can be seen that mainly other bioinformaticians use the program. Thus, the developer decides that the program should be accessible to more researchers and looks for ways to make the program usable by everyone. Since the program is written in Python, it is cross-platform compatible. However, it is noticed that domain experts do not install and use the program. Thus the developer must look for an easy way to distribute the application and make it accessible to more researchers. The developer’s time is limited, having other projects waiting. There is also little support for developing a GUI from colleagues, as they have different views on the extent of autonomy a wet lab researcher should have regarding sequencing analysis.
bioGUI paper mockup
|
Extending templates with script nodes
Often it is required to perform string manipulations (e.g., remove file extensions) for CL arguments. For instance, the example below takes as input a HISAT2 index file and removes the file extension, such that the index will be accepted by HISAT2. For evaluation of this node, the evaluate function is called with the argv references as input parameters. The last return value of the script’s call stack is taken as the output value of the script -node.
Listing 1. bioGUI script node with LUA function example. Upon evaluating this node, the evaluate function will be called with the arguments listed in the argv attribute of the script node.
<script id=“hisat_index_rel” argv=“${hisat_index_rel_raw}”>
<![CDATA[
function evaluate(arg1)
if (string.match(arg1, “.%d.ht2$”)) then
return(string.sub(arg1, 0, arg1:find(“.%d.ht2$”)-1))
end
return(arg1)
end
]]>
</script>
Evaluating a bioGUI template
In Fig. A2, the process of assembling a CL call from the shown bioGUI template is explained. First, the creation of the <window> model (dark gray) will be explained, followed by the creation of the CL arguments using the <execution> model (shaded).
|
The window component consists of four different components, which are grouped in a vertical layout (default for window component). A label describing the input file dialog is placed on the main window, followed by the actual file dialog with ID input. Then a group box with title and a checkable status is created, which contains an output file dialog. Finally, the action button, which starts the CL call assembly and the subprocess of this program, and the text output elements are created.
When the user has entered all desired data and clicks the action button, the execution phase defined by the execution model will be launched. Therefore the program defined in the execute element is started. For this, the parameters (param) must be assembled. Any text within ${var} is interpreted as a reference to a variable "var" or the value of a GUI element with id "var." Thus, the CL is successively assembled. At first the ${input} element is interpreted and retrieves the value from the input file dialog as this element matches the id. Next the ${output} is interpreted. The ${output} refers to an "if" construct in the execution part, which compares the value of the element with id "os" to the string "TRUE" (which indicated whether the groupbox is checked). If this value is true, this node evaluates to netcat 192.168.1.100 55025, otherwise to tee -a {output file path}. Finally, the program "sh" is executed with the created CL arguments. For instance, if the group box is checked, the sh -c “cat inputFile | netcat 192.168.1.100 55025” will be executed. A full reference of all input types as well as all execution nodes is available online.
In fact, the evaluation of the execution network resembles the simulation of a petri net (Fig. A3). Each node in the execution network is a place, and its modification/function is the transition, which requires values for all its input places, to generate the output token.
|
Running programs via bioGUI
Program execution via bioGUI can be accomplished via different paths, which are shown in Fig. A4. The easiest way is to execute a native program (one that runs natively on the operating system, e.g., Docker). Then all output can be piped to bioGUI to display this to the user. If the host is a Microsoft Windows 10 OS, bioGUI can also run Unix programs via WSL. Then the Unix program runs natively in a WSL bash. The resulting output can be transferred to bioGUI via pipes. Of course, for both native and WSL processes, the output can also be transferred via netcat to bioGUI. The transfer of the GUI template within install modules is an example. If a process runs on a remote computer, the output can be transferred to bioGUI also via network, for example, netcat. Such a process can, for instance, be started by calling ssh from bioGUI with appropriate parameters. Finally bioGUI can also send HTTP POST requests to web services and accepts an HTTP response as answer. This output can also be displayed by bioGUI.
Since the Docker engine is a local, native process, bioGUI also supports the use of Docker containers. The Circlator template is an example of how this can be implemented.
|
Hardware specification for benchmarks
The relevant hardware for benchmarking bioGUI is summarized in Table A1.
| ||||||||||||||||||||||||
Template access
|
User survey
A user survey with 10 participants (four bioinformaticians, and six collaborators consisting of two undergraduate bioinformatics students and four external collaborators) was performed. The derived results are shown in Table A2, and the raw data are shown in Table A3.
| ||||||||||||||||||||||||||||||||||||||||||||||||||||||
| ||||||||||||||||||||||||||||||||||||||||||||||||||||||||||||||||||||||||||||||||||||||||||||||||||||||||||||||
|
Supplemental information
- DOI 10.7717/peerj.8111/supp-1 - Survey questions on command-line tools and bioGUI: This is the original survey used to assess problems with current bioinformatics applications. (PDF)
- DOI 10.7717/peerj.8111/supp-2 - Answers on the survey on command-line tools and bioGUI: Each column represents a single participant. Questions are in rows. (XLXS)
Acknowledgements
We thank Luisa F. Jimenez-Soto and Gergely Csaba for their valuable input as well as for reviewing the manuscript. We thank the participants in our survey for their time. We thank the reviewers for their constructive feedback.
Authors’ contributions
Markus Joppich conceived and designed the experiments, performed the experiments, analyzed the data, prepared figures and/or tables, authored or reviewed drafts of the paper, and approved the final draft. Ralf Zimmer conceived and designed the experiments, analyzed the data, prepared figures and/or tables, authored or reviewed drafts of the paper, and approved the final draft.
Funding
This work was supported by the Deutsche Forschungsgemeinschaft (Collaborative Research Centre SFB 1123-2/Z2). The funders had no role in study design, data collection and analysis, decision to publish, or preparation of the manuscript.
Data availability
The bioGUI documentation is available here. In order to set up Windows Subsystem for Linux (required for using bioGUI on Windows), follow the steps documented here. bioGUI is open-source software. Releases and code are available on the GitHub project page. Additional software (cwl2biogui) is available here.
Competing interests
The authors declare that they have no competing interests.
References
- ↑ Grabherr, M.G.; Haas, B.J.; Yassour, M. et al. (2011). "Full-length transcriptome assembly from RNA-Seq data without a reference genome". Nature Biotechnology 29 (7): 644–52. doi:10.1038/nbt.1883. PMC PMC3571712. PMID 21572440. https://www.ncbi.nlm.nih.gov/pmc/articles/PMC3571712.
- ↑ 2.0 2.1 Bolger, A.M.; Lohse, M.; Usadel, B. (2014). "Trimmomatic: A flexible trimmer for Illumina sequence data". Bioinformatics 30 (15): 2114-20. doi:10.1093/bioinformatics/btu170. PMC PMC4103590. PMID 24695404. https://www.ncbi.nlm.nih.gov/pmc/articles/PMC4103590.
- ↑ 3.0 3.1 3.2 Pertea, M.; Kim, D.; Pertea, G.M. et al. (2016). Transcript-level expression analysis of RNA-seq experiments with HISAT, StringTie and Ballgown. 11. pp. 1650–67. doi:10.1038/nprot.2016.095. PMC PMC5032908. PMID 27560171. https://www.ncbi.nlm.nih.gov/pmc/articles/PMC5032908.
- ↑ 4.0 4.1 4.2 4.3 4.4 4.5 Morais, D.; Roesch, L.F.W.; Redmile-Gordon, M. et al. (2018). BTW-Bioinformatics Through Windows: An easy-to-install package to analyze marker gene data. 6. pp. e5299. doi:10.7717/peerj.5299. PMC PMC6074753. PMID 30083449. https://www.ncbi.nlm.nih.gov/pmc/articles/PMC6074753.
- ↑ 5.0 5.1 Marçais, G.; Kingsford, C. (2011). "A fast, lock-free approach for efficient parallel counting of occurrences of k-mers". Bioinformatics 27 (6): 764–70. doi:10.1093/bioinformatics/btr011. PMC PMC3051319. PMID 21217122. https://www.ncbi.nlm.nih.gov/pmc/articles/PMC3051319.
- ↑ 6.0 6.1 Delcher, A.L.; Bratke, K.A.; Powers, E.C. et al. (2007). "Identifying bacterial genes and endosymbiont DNA with Glimmer". Bioinformatics 23 (6): 673–9. doi:10.1093/bioinformatics/btm009. PMC PMC2387122. PMID 17237039. https://www.ncbi.nlm.nih.gov/pmc/articles/PMC2387122.
- ↑ Hosny, A.; Vera-Licona, P.; Laubenbacher, R. et al. (2016). "AlgoRun: A Docker-based packaging system for platform-agnostic implemented algorithms". Bioinformatics 32 (15): 2396–8. doi:10.1093/bioinformatics/btw120. PMC PMC6280798. PMID 27153722. https://www.ncbi.nlm.nih.gov/pmc/articles/PMC6280798.
- ↑ Schadt, E.E. (2012). "The changing privacy landscape in the era of big data". Molecular Systems Biology 8: 612. doi:10.1038/msb.2012.47. PMC PMC3472686. PMID 22968446. https://www.ncbi.nlm.nih.gov/pmc/articles/PMC3472686.
- ↑ Gymrek, M.; McGuire, A.L.; Golan, D. et al. (2013). "Identifying personal genomes by surname inference". Science 339 (6117): 321–4. doi:10.1126/science.1229566. PMID 23329047.
- ↑ Albert, I. (2016). "The Biostar Handbook". https://biostar.myshopify.com/.
- ↑ Pavelin, K.; Cham, J.A.; de Matos, P. et al. (2012). "Bioinformatics meets user-centred design: a perspective". PLoS Computational Biology 8 (7): e1002554. doi:10.1371/journal.pcbi.1002554. PMC PMC3395592. PMID 22807660. https://www.ncbi.nlm.nih.gov/pmc/articles/PMC3395592.
- ↑ Smith, D.R. (2013). "The battle for user-friendly bioinformatics". Frontiers in Genetics 4: 187. doi:10.3389/fgene.2013.00187. PMC PMC3778374. PMID 24065986. https://www.ncbi.nlm.nih.gov/pmc/articles/PMC3778374.
- ↑ Smith, D.R. (2015). Buying in to bioinformatics: An introduction to commercial sequence analysis software. 16. p. 700-9. doi:10.1093/bib/bbu030. PMC PMC4501248. PMID 25183247. https://www.ncbi.nlm.nih.gov/pmc/articles/PMC4501248.
- ↑ 14.0 14.1 14.2 14.3 14.4 Visne, I.; Dilaveroglu, E.; Vierlinger, K. et al. (2009). RGG: A general GUI Framework for R scripts. 10. p. 74. doi:10.1186/1471-2105-10-74. PMC PMC2653488. PMID 19254356. https://www.ncbi.nlm.nih.gov/pmc/articles/PMC2653488.
- ↑ 15.0 15.1 Afgan, E.; Baker, D.; van den Beek, M. et al. (2016). "The Galaxy platform for accessible, reproducible and collaborative biomedical analyses: 2016 update". Nucleic Acids Research 44 (W1): W3–W10. doi:10.1093/nar/gkw343. PMC PMC4987906. PMID 27137889. https://www.ncbi.nlm.nih.gov/pmc/articles/PMC4987906.
- ↑ Hunter, A.A.; Macgregor, A.B.; Szabo, T.O. et al. (2012). "Yabi: An online research environment for grid, high performance and cloud computing". Source Code for Biology and Medicine 7 (1): 1. doi:10.1186/1751-0473-7-1. PMC PMC3298538. PMID 22333270. https://www.ncbi.nlm.nih.gov/pmc/articles/PMC3298538.
- ↑ 17.0 17.1 17.2 Xu, G.; Strong, M.J.; Lacey, M.R. et al. (2014). "RNA CoMPASS: A dual approach for pathogen and host transcriptome analysis of RNA-seq datasets". PLoS One 9 (2): e89445. doi:10.1371/journal.pone.0089445. PMC PMC3934900. PMID 24586784. https://www.ncbi.nlm.nih.gov/pmc/articles/PMC3934900.
- ↑ 18.0 18.1 Anslan, S.; Bahram, M.; Hiirsalu, I. et al. (2017). "PipeCraft: Flexible open-source toolkit for bioinformatics analysis of custom high-throughput amplicon sequencing data". Molecular Ecology Resources 17 (6): e234-e240. doi:10.1111/1755-0998.12692. PMID 28544559.
- ↑ 19.0 19.1 19.2 19.3 Vetrovský, T.; Baldrian, P.; Morais, D. (2018). "SEED 2: A user-friendly platform for amplicon high-throughput sequencing data analyses". Bioinformatics 34 (13): 2292-2294. doi:10.1093/bioinformatics/bty071. PMC PMC6022770. PMID 29452334. https://www.ncbi.nlm.nih.gov/pmc/articles/PMC6022770.
- ↑ 20.0 20.1 Amstutz, P.; Andeer, R.; Chapman, B. et al. (15 March 2016). "Common Workflow Language, Draft 3". FigShare. https://figshare.com/articles/Common_Workflow_Language_draft_3/3115156/1.
- ↑ Hillion KH1, Kuzmin I2, Khodak A. et al. (2017). "Using bio.tools to generate and annotate workbench tool descriptions". F1000Research 6: ELIXIR-2074. doi:10.12688/f1000research.12974.1. PMC PMC5747335. PMID 29333231. https://www.ncbi.nlm.nih.gov/pmc/articles/PMC5747335.
- ↑ 22.0 22.1 22.2 22.3 Ammar, C.; Gruber, M.; Csaba, G. et al. (2019). "MS-EmpiRe Utilizes Peptide-level Noise Distributions for Ultra-sensitive Detection of Differentially Expressed Proteins". Molecular and Cellular Proteomics 18 (9): 1880–92. doi:10.1074/mcp.RA119.001509. PMC PMC6731086. PMID 31235637. https://www.ncbi.nlm.nih.gov/pmc/articles/PMC6731086.
- ↑ 23.0 23.1 Ruan, J.; Li, H. (2019). "Fast and accurate long-read assembly with wtdbg2". Nature Methods. doi:10.1038/s41592-019-0669-3. PMID 31819265.
- ↑ 24.0 24.1 Bankevich, A.; Nurk, S.; Antipov, D. et al. (2012). "SPAdes: A new genome assembly algorithm and its applications to single-cell sequencing". Journal of Computational Biology. doi:10.1089/cmb.2012.0021. PMC PMC3342519. PMID 22506599. https://www.ncbi.nlm.nih.gov/pmc/articles/PMC3342519.
- ↑ 25.0 25.1 Hunt, M.; Silva, N.D.; Otto, T.D. et al. (2015). "Circlator: Automated circularization of genome assemblies using long sequencing reads". Genome Biology 16: 294. doi:10.1186/s13059-015-0849-0. PMC PMC4699355. PMID 26714481. https://www.ncbi.nlm.nih.gov/pmc/articles/PMC4699355.
- ↑ Langmead, B.; Trapnell, C.; Pop, M. et al. (2009). "Ultrafast and memory-efficient alignment of short DNA sequences to the human genome". Genome Biology 10 (3): R25. doi:10.1186/gb-2009-10-3-r25. PMC PMC2690996. PMID 19261174. https://www.ncbi.nlm.nih.gov/pmc/articles/PMC2690996.
- ↑ Langmead, B.; Salzberg, S.L. (2012). "Fast gapped-read alignment with Bowtie 2". Mature Methods 9 (4): 357–9. doi:10.1038/nmeth.1923. PMC PMC3322381. PMID 22388286. https://www.ncbi.nlm.nih.gov/pmc/articles/PMC3322381.
- ↑ Li, H.; Durbin, R. (2009). "Fast and accurate short read alignment with Burrows-Wheeler transform". Bioinformatics 25 (14): 1754–60. doi:10.1093/bioinformatics/btp324. PMC PMC2705234. PMID 19451168. https://www.ncbi.nlm.nih.gov/pmc/articles/PMC2705234.
- ↑ Koren, S.; Walenz, B.P.; Berlin, K. et al. (2017). "Canu: Scalable and accurate long-read assembly via adaptive k-mer weighting and repeat separation". Genome Research 27 (5): 722–36. doi:10.1101/gr.215087.116. PMC PMC5411767. PMID 28298431. https://www.ncbi.nlm.nih.gov/pmc/articles/PMC5411767.
- ↑ 30.0 30.1 30.2 Liao, Y.; Smyth, G.K.; Shi, W. (2014). "featureCounts: an efficient general purpose program for assigning sequence reads to genomic features". Bioinformatics 30 (7): 923–30. doi:10.1093/bioinformatics/btt656. PMID 24227677.
- ↑ 31.0 31.1 Sović, I.; Šikić, M.; Wilm, A. et al. (2016). "Fast and sensitive mapping of nanopore sequencing reads with GraphMap". Nature Communications 7: 11307. doi:10.1038/ncomms11307. PMC PMC4835549. PMID 27079541. https://www.ncbi.nlm.nih.gov/pmc/articles/PMC4835549.
- ↑ Kim, D.; Paggi, J.M.; Park, C. et al. (2019). "Graph-based genome alignment and genotyping with HISAT2 and HISAT-genotype". Nature Biotechnology 37 (8): 907–15. doi:10.1038/s41587-019-0201-4. PMID 31375807.
- ↑ Wheeler, T.J.; Eddy, S.R. (2013). "nhmmer: DNA homology search with profile HMMs". Bioinformatics 29 (19): 2487-9. doi:10.1093/bioinformatics/btt403. PMC PMC3777106. PMID 23842809. https://www.ncbi.nlm.nih.gov/pmc/articles/PMC3777106.
- ↑ Wang, Q.; Ni, C.-m., Li, Z. et al. (2019). "PureseqTM: efficient and accurate prediction of transmembrane topology from amino acid sequence only". bioRxiv. doi:10.1101/627307.
- ↑ Shen, S.; Park, J.W.; Lu, Z.X. et al. (2014). "rMATS: Robust and flexible detection of differential alternative splicing from replicate RNA-Seq data". Proceedings of the National Academy of Sciences of the United States of America 111 (51). doi:10.1073/pnas.1419161111. PMC PMC4280593. PMID 25480548. https://www.ncbi.nlm.nih.gov/pmc/articles/PMC4280593.
- ↑ 36.0 36.1 Rehmsmeier, M.; Steffen, P.; Hochsmann, M. et al. (2004). "Fast and effective prediction of microRNA/target duplexes". RNA 10 (10). doi:10.1261/rna.5248604. PMC PMC4280593. PMID 15383676. https://www.ncbi.nlm.nih.gov/pmc/articles/PMC4280593.
- ↑ Li, B.; Dewey, C.N. (323). "RSEM: Accurate transcript quantification from RNA-Seq data with or without a reference genome". BMC Bioinformatics 12. doi:10.1186/1471-2105-12-323. PMC PMC3163565. PMID 21816040. https://www.ncbi.nlm.nih.gov/pmc/articles/PMC3163565.
- ↑ Li, H.; Handsaker, B.; Wysoker, A. et al. (2009). "The Sequence Alignment/Map format and SAMtools". Bioinformatics 25 (16): 2078-9. doi:10.1093/bioinformatics/btp352. PMC PMC2723002. PMID 19505943. https://www.ncbi.nlm.nih.gov/pmc/articles/PMC2723002.
- ↑ Li, H. (2018). "Minimap2: pairwise alignment for nucleotide sequences". Bioinformatics 34 (18): 3094–100. doi:10.1093/bioinformatics/bty191. PMC PMC6137996. PMID 29750242. https://www.ncbi.nlm.nih.gov/pmc/articles/PMC6137996.
- ↑ Li, H. (2016). "Minimap and miniasm: Fast mapping and de novo assembly for noisy long sequences". Bioinformatics 32 (14): 2103–10. doi:10.1093/bioinformatics/btw152. PMC PMC4937194. PMID 27153593. https://www.ncbi.nlm.nih.gov/pmc/articles/PMC4937194.
- ↑ Vaser, R.; Sović, I.; Nagarajan, N. et al. (2017). "Fast and accurate de novo genome assembly from long uncorrected reads". Genome Research 27 (5): 737-46. doi:10.1101/gr.214270.116. PMC PMC5411768. PMID 28100585. https://www.ncbi.nlm.nih.gov/pmc/articles/PMC5411768.
Notes
This presentation is faithful to the original, with only a few minor changes to presentation, spelling, and grammar. We also added PMCID and DOI when they were missing from the original reference. The original article lists references alphabetically, but this version—by design—lists them in order of appearance.
